Sep 08 2007
Halloween Treat Box
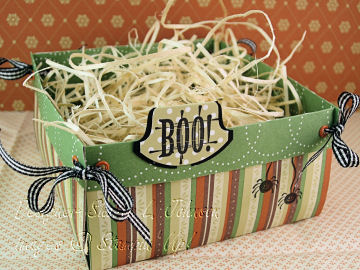
- Stamps: Autumn Apparitions
- Paper: Apple Cider DP, Basic Black
- Ink: Black Stazon
- Accessories: Round Tab Punch, Gingham Ribbon, Crop-A-Dile, Really Rust Eyelets
This is a quick little box I made for Halloween treats. I have no treats today so it is filled with straw! I wasinspired to make this by abox in this style in the SCS galleryof Willosmama as well as the sample in the SU Catalog, page 49. I determined my own measurements to suit my needs. Not being sure what I’ll use this for, and as I MAY insert Halloween cards into it rather than treats, I wanted to be sure it was wide enough to easily house the cards; therefore, I made it 4 1/2″ square and it is 2 1/4″ high. Here’s the instructions:
Cut 2 pieces of double sided DP, each 10.5 x 4.5.Score each piece at 3 and 7.5. Now, put them back in the scorer and score each piece .75″ from the end, all 4 ends (this gives you the folded over flap). So putting them in the scorer and setting them up at 9.75 gives you that .75 at the end. Fold into shape to make sure all is right! Do any stamping you want on the box at this point. Now using your Crop-A-Dile, and making sure the flaps are folded down, punch holes on each side of each end, .5″ in from the end, and centered on the fold over flap. Insert eyelets into those holes. Lay your two pieces down, one on top of the other, in a + shape, using a little tape to keep the two bottom pieces together. Fold the sides up and thread with ribbon and tie to keep the box in shape. Make a little Boo with the round tab punch, border it with black as described in the previous post entitled Autumn Apparition Trio, attach to box and you are done!!!! A very quick and easy box for giving a little gift or just setting out with Halloween candies!
Hint: If you want to save this box for next Halloween, just untie the ribbon and it will store flat, taking essentially no room at all!!! You could actually make a little table decoration box like this for every holiday and store them all in one file folder — how fun!!!!
20 responses so far


Is this sweet! What a beautiful little Fall basket–great job as always, Sharon!
Sharon! This is really a darling box! Thanks for the instructions….
Congrats on the new blog, too!
Connie
http://inkspiredtreasures.blogspot.com
OMG! This is box is ADORABLE! Great instructions! It looks so easy to CASE (wink~wink)!
Wonderful box!
I LOVE your Halloween box! What a great idea for so many different uses! Thanks for all the details as well!
Oh, how fun! This is just darling! Love the idea of storing them flat. The spiders “dangling” on the side are the perfect touch. Things like this really make a home “homey”. I love it!
This is soooooooo cute. Can’t wait to try one. Thanks for the instructions.
Oh, this is so cute and so easy! I saw this here and had to try it right away–whipped one of these babies out in no time at all. Oh how my mind is racing with fun ideas with this little diddy
HOW AWESBOMB!! I’m SO happy to hear you have a blog!! I LOVE your work and often miss it on SCS! YOU GO GIRL!!!
Thanks for sharing this cool treat box! YOU ROCK!
~Cambria
Fabulous box Sharon!!
This is an adorable treat box!!! It would be really neat made up in different sizes to place serving dishes or chips in for a special party!!! Very cute!!!
This is such a great box.. and so versatile… I will have to CASE and there will be many around my house during the holidays and for gifts.. TFS!
Woohoo! Sharon now has a blog! I will add you to my friends list. 🙂 This is absolutely adorable as always! 🙂
Hi Sharon! Me again! Just wanted to let you know that I made one of your boxes … the directions were very clear … great job! THANK YOU for the instructions and the inspiration! You can find my Halloween treat box here: http://stampinat6213.blogspot.com/
What a great box (except for those spiders!), especially the great use of double sided papers. So many possibilities. As always, thanks for all the details. Linda
Great Job, you absolutely ROCK! Love the box and the storage tips.
Debi
SO cute!!! Thanks for the how-to!! You’re awesome!
Thanks Sharon for the easy to follow instructions of your really fun box. Would be a great idea for a Hostess Party project……..besides, I just love boxes. TFS
DARLING!! Just darling!! XOXOX the tab that you added to the top side and that DP is to die for! TFS
Adorable box…this will give many great ideas!