Feb 18 2008
Graduation
This is my first attempt using the new SU graduation set called Great Grads! I can not even begin to count the number of graduation cards I have made in the last many years, and can you believe I have never had a graduation set, just odds and ends from here and there!!! So, I’m very pleased to have this set!!!
I made 2 cards — one is more masculine and is a check holder and the other is definitely feminine and is a gift card holder. I did them both in black and white, which I think is a classic and always works. Personally, I’m not real nuts about doing grad cards in school colors. School colors may look great in uniforms, but they typically just don’t do it for me when I’m making a card, and I want to enjoy the process as much as the end result, so I often use colors that I prefer — though I do sometimes cave and go with the school colors — LOL!!! So much for team spirit — huh! I also used the Cuttlebug with some new embossing folders on these cards. Here’s the 1st:
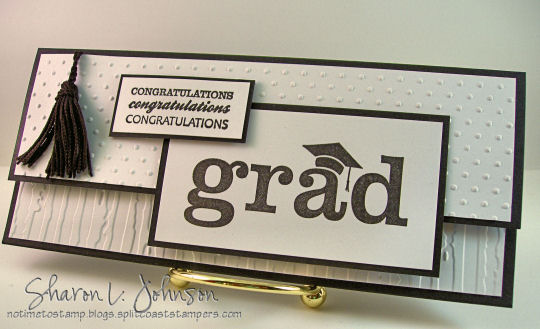
This is the check holder. The Grad flap is held secure with Velcro dots and inside is a pocket for a check. The tassel is a bookmark tassel. I used 2 new embossing folders — the Swiss Dots and Stripes. This card is 7.5″ wide, and at the end of this post, I’ll show you how to get a strip of dots or stripes that long. To make this card, cut your paper 7.5″ wide and 7″ high. Score at 2 1/4 and 5 1/2, making sure you are scoring along the 7.5″ width. This will leave you with a 2 1/4″ flap for the top and a 1 1/2″ flap which folds up for the pocket. Use red sticky strip on the ends to adhere the flap up for the pocket. For the embossed panels, cut 2 white strips 7.5″ x 4 (this gives you left overs for another card — once you are running it through, might as well get enough for extras). Refer to bottom of this post for the Cuttlebug photos.
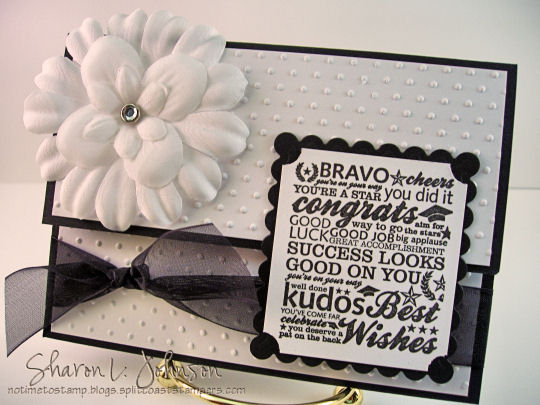
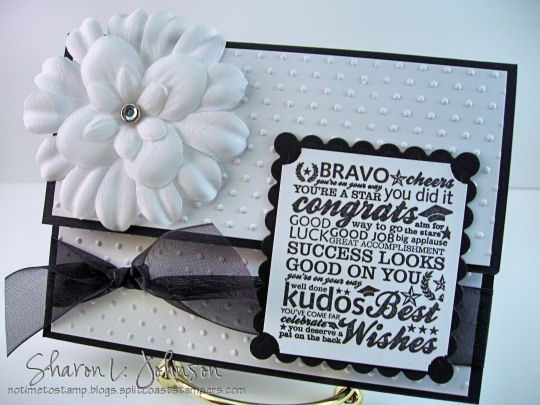
This is the card that is definitely feminine. We don’t usually make graduation cards too frilly, but I think it is totally appropriate to make a card like this for a girly-girl type, don’t you? This one is done in a similar fashion, only this is a gift card holder. Start with a 1/2 sheet of paper. 8.5 x 5.5. Score at 2 and 6, which gives you flaps of 2″ (the pocket) and 2.5″ (the top flap). This card uses the Swiss Dots embossing folder. I also used the Rectangle Scallop Nestability by Spellbinders to frame the sentiment. However, none of the scallop dies was quite the right size, so I took the one that was the closest to what I needed — it was just 1 scallop too long — so I cut it in half right across the middle and then re-taped it together with a one scallop overlap. I have done this many times before, and it is just amazing at how nearly invisible this is. I used a Ticket Corner punch on the sentiment before mounting it to the scallop. I used a flower and brad from the SU Pretties Kit and retired SU black organdy ribbon. The sentiment is adhered to the card top and there is a Velcro dot underneath so it will stay closed.
Now, I’m going to try to do the following pictures in thumbnails, so just click on them to enlarge them if you’re interested. The first is a picture of how to insert the paper into the folder to get a long run of pattern. My sheets of paper are 7.5″ x 4″.
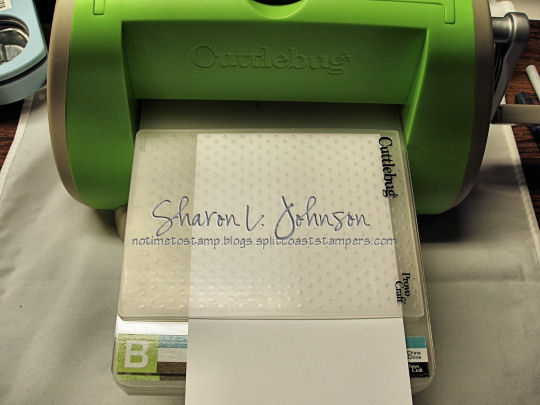
Insert the paper as shown in the photo above. Once it runs through, take it out and put it back into the folder as shown below:
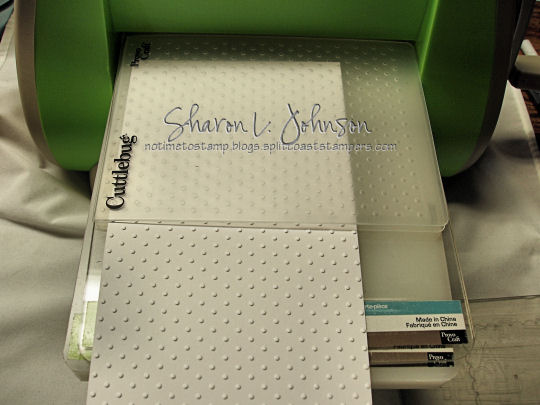
Now, we run into a problem when using the Swiss Dots pattern, so I’ll try to explain it here. This does not happen with the Stripes — they work out just fine.When wetake out the Swiss Dots sheet and put it back in the folder for the second run through, make sure you align up the dots so the pattern stays consistent. Now, I’ve done this many times, and I can’t figure another way to do this to avoid the problem — but what happens is when you align up the pattern, the last row of dots gets squished flat when you run it through. It’ll look like this:

Can you see that line in the center of squished dots? Well, there MUST be a way to run it through so that doesn’t happen, I just haven’t had the time to play any more to figure it out — so I just did a quick fix, as shown below:
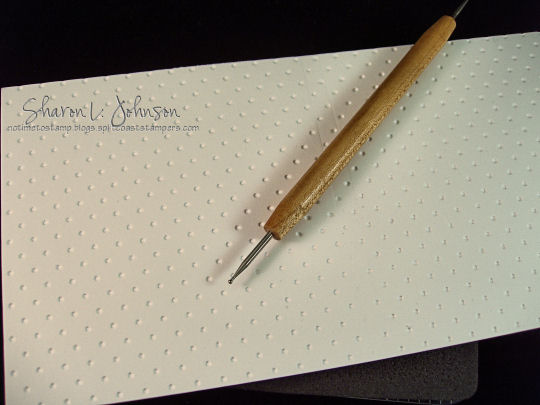
I turned the pattern over so it is upside down, on a soft piercing mat, and VERY GENTLY (because it pokes through so easily) pressed on each squished dot with an old wooden stylus tip — with hardly any pressure at all, the squished dot was back up and good as new. In just a second you can do the entire row and it is impossible to tell what had happened — so that was my quick fix to the problem.
You’ll also notice I told you to cut the sheets going into the Cuttlebug 7.5″ wide, which is the same width as the card. But when we mount it onto the card we need it to be 7 1/4. Just cut it to the 7 1/4″ you need. I have found that if I put it in the Cuttlebug at exactly the right size, it often comes out smaller because of how the embossing can change the size a bit, so when size is crucial, I like to start a bit larger and then cut after embossing.
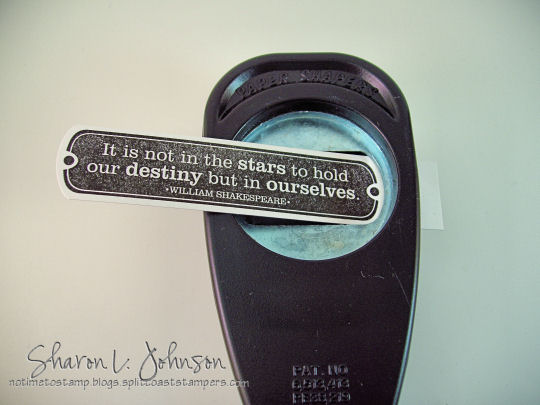
OK, now once I had this set out, I thought I’d show you how you can use the Key Tag Punch on the long sentiment with the rounded ends. I haven’t used it in a card, but here’s a sample of how to punch it . First stamp the image on a strip of paper, then cut the strip to 1″ wide. I just find it easier to stamp first, then cut to size. If I start with a 1″ strip and try to perfectly place and center a long stamp, I often mess up — course if you are one to use a Stamp-a-ma-jig always, that would solve that problem. Anyway, once your stamped strip is 1″ wide, then we need to run it through the Key Tag Punch. Now, since it is the right width, we are only clipping the ends in the punch. Put the strip in the punch, but then pull out (up and and through the hole) one end of the strip, then position and punch the other end that is still in the punch. Then repeat for the other side. This is what it looks like in the punch:
Hope that helps! Here’s my list of supplies, and this list covers both cards.
- Stamps: Great Grads
- Paper: Basic Black and Whisper White
- Ink: Black Stazon
- Accessories: Tassel, Pretties Kit, Spellbinders Rectangle Dies, Ticket Corner Punch, Cuttlebug and Embossing Folders (Swiss Dots and Stripes), Mini Glue Dots, Mounting Tape, Red Sticky Strip, Velcro
Hope you all had a wonderful weekend!!! Thanks much for stopping in. My next couple projects will be more SU samples.
33 responses so far


The grad cards look fantastic! Thanks so much for the tips for the cuttlebug and the dots — very, very handy to know!!
Great cards and I fully agree with you about black and white being THE colours for graduation…love them both and thanks also for the tutorial…hope to get time to do that when my swiss dots come.
These are so great! I have a ton of grad cards to make this year and I need to get this set! Thanks so much for sharing your ideas!
Sharon,
Thank you so much for the explanation on the Swiss Dots. I don’t have this embossing folder yet, but plan to purchase it very soon. I have wondered how you managed to keep the dots in line clear across the card. In fact, I had planned to write to you and ask you this question. So, thanks for answering before I asked.
I don’t have the Cuttlebug, but I do have the Sizzix and I believe I have been told the Cuttlebug dies can be used in the Sizzix??? I certainly hope so, as I think that Swiss Dots make an absolutely beautiful card.
I have seen a lot of cards, but yours are absolutely my favorite! Thanks for all the tutorials!
Thank you for the beautiful examples of this set! I have a high school senior this year and will be using this stamp set a lot, I’m sure! Your card are gorgeous.
Sharon, thanks for sharing all of these little ‘helps’. I too have been making Graduation Gift cards for the past few years (25+ each year) and have never had a complete set to work with, just bits and pieces from here and there, so I was so excited to get this set. (I have a daughter graduating this year and another daughter next year) This black and white is so striking, I am going to try some this year. The friends that want to buy them have even sent me the invitation so I had the ‘correct’ school color to use, so I still have to use school colors on some, but I am so in awe with the black and white. Thank you again –
Awesome, as usual. I love it! My son graduates this year and we will have lots of parties so this is a great idea! Thanks for sharing!!
Great cards & wonderfully helpful tutorial on embossing with the Swiss dots. I don’t have that folder either, but it is on my Wish List, and now knowing how to eliminate that little problem will save future frustration! You are such a sweetie! Thanks!
LeAnne
such beautiful cards! i’m very excited about this set also! and i think you’ve sold so many of us on the swiss dots embossing folder! i did ask at hanna stamps and they will be getting it in!!
shelley
Beautiful cards, as usual! I too have a senior this year and will be getting this set~
One question however. I have no plans really to get the cuttlebug, etc. What would you suggest in place of the embossed paper—perhaps a very subtle print designer paper?
thanks for all of your hard work!
These are spectacular!!!
Gorgeous Graduation cards! Love the black & white combo!!!
These money and gift grad holders are awesome!! That swiss dots folder sure is versatile………..just love it! Really appreciate the easy to understand tutorials too!
Beautiful cards!!! Like the black and white colors!!! Very elegant too!!!
Fabulous grad cards, Sharon. Perfect colors. I have both of those embossing folders ordered and can’t wait for them to get here so I can start playing with them. Love the combination of both of them on the top card.
Wow……both so beautiful, but one masculine and one feminine. TFS your CB tutorial also. I have never had a grad set either. You might make me get this set 🙂
You must have really been on the ball ordering your new CB folders. I can’t find them in stock any where now. But I love what you’ve done with them. Great, classy grad cards.
I love your tutorials Sharon! Thank you so much for sharing them; I really appreciate the info! Your grad cards are just great and what a head start you have now! Woohoo!
Fantastic tutorial. I teach a Cuttlebug class and wanted to figure out how to extend the length. Thank you, thank you, thank you. I found you through Kim P giving you the Excellent blogger award. I love your work and will be subscribing.
This will be a fun project, Sharon. Which one are we doing? Both of them are really cool. I think the guy one is my fav…although that could really be for either. See you Wednesday.
I had the same flattening problem when I tried this as well, but I never thought to fix it with manual embossing … good tip … thanks.
These are awesome just like the rest of your cards. I was thinking about getting this set and now I will. Thanks!
Both cards are fabulous – I am especially drawn to the card with the flowers. Very elegant.
Sharon, thanks for this great post! I LOVE these cards…and I’m waiting for my new Cuttlebug folders…can’t wait to try these both out!!
You are so clever! Thanks for figuring all this out for us! I have the Swiss Dots EF coming in a few days, and you have saved me a lot of time! Great cards!!!!
WOW!! Beautiful cards…I don’t have any “graduating” kids around but loved seeing the “Swiss Dots” & “Lines” folders being used and how to make longer pieces. Thanks for all the tips.
Barb S.
These are GREAT cards! I love the black and white. These are fabulous! Thanks for sharing.
Great cards! Just wanted to mention that I’ve cut the embossing folders around the design to eliminate the smashing thing….works great! Use an old scissors cuz they are kinda tough to cut through. I cut one layer at a time.
What wonderful cards! I’ve always meant to make gift card holders, especially at Christmas, so now I finally did. For my brother’s birthday anyway. I hope you like it. It was a lot of fun to make. I hope the ribbon doesn’t make it any less masculine. I just thought it needed a little extra something. Thanks for all the wonderful and insirational posts.
Dana
http://www.danadabblingstudio.blogspot.com
Sharon, both of these cards are fantastic! So perfect for the graduate. Yikes, my son is graduating this year. If I can’t get inspiration from one of these cards, I’ll never find it.
Fabulous graduation cards. Like them both.
Wowee! Very cool! I love both styles and your technique for extending the embossed pattern is fantastic! Thank you!
[…] As the card is 5¼” square the cuttlebug matte needed to be wider than the embossing folder. I put it through once and then moved the folder over to the unembossed strip down the side of the square and carefully fitted the folder partially over the already embossed part of the square but also over the rest of the square. Sharon actually explains how to do it with pictures here. […]