May 20 2008
Grads, Monograms and Tassel Tutorial
This post comes a day late, but at least it’s here now!!! And 10 Minute Tuesday will be about a 1/2 day late as well, but it’s coming!!! Trying real hard to get caught up!!!
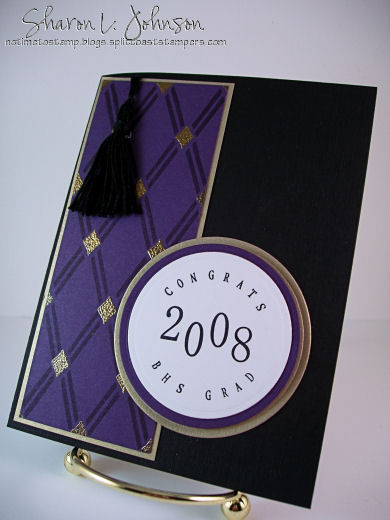
This is a fairly quick and easy grad card for a guy, featuring a *somewhat personalized* monogram made with the JustRite Monogram Stamper (C-45) and the Harlequin stamp set by Flourishes. When I say *somewhat personalized* what I mean is, rather than having the graduates name on each card I make (I had 8 cards to do for grads from this school), I found it much quicker to put on the year and a simple *Congrats BHS Grad*. This way theyget their year and their school name on the card, though not their own name = somewhat personalized!!! Using the C-45 I can kick out 8 of these in a matter of seconds, as opposed to the time it would take to change the grads name on each, so — it works for me!!! Oh, and I loved the colors to work with — our school colors are purple and gold and the class colors were black and white — a great combo!!!
I used the Small Letters and the Medium/Large Numbers on the Monogram Stamper (C-45) to make this monogram. However, since all the letters and numbers are interchangeable from the C-45 to the smaller wooden stampers, and vice versa, I could have just as easily done this with one of the smaller wooden stampers. Personally, I just prefer the ease of being able to stamp out many of the same monogram super quickly with the C-45.
The grid pattern is done with Harlequin by Flourishes, stamped tone on tone on the Eggplant Paper, with the diamond centers being gold embossed. The gold matting layerson the grid image and the monogrammed image are made with gold metallic cardstock. The monogrammed image and all layers are cut and embossed using the Circle Nestabilities.
- Stamps: Harlequin by Flourishes and the JustRite Monogram Stamper C-45 by JustRite.
- Paper: White, Black Textured, Elegant Eggplant, Gold Metallic.
- Ink: Black, Elegant Eggplant, Versa Mark.
- Accessories: Gold Embossing Powder, Tassel (tutorial below), Circle Nestabilities by Spellbinders, Mini Glue Dots, Mounting Squares.
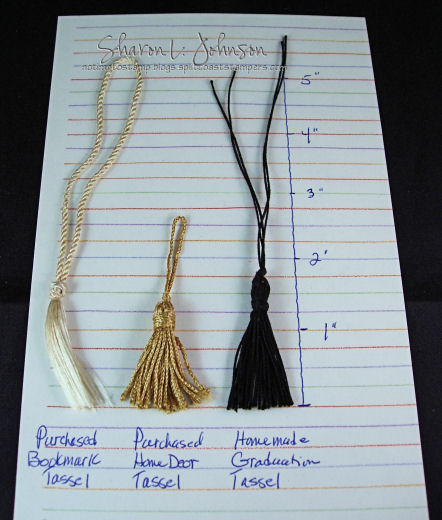
The tassel on this card is home made and a tutorial follows. I have received a lot of questions from readers as to where I get these — well, it is getting to be a problem. I have picked up the bookmark sized tassles with the longer strings at craft stores often times. The short ones that I’ve been using for graduation tassels have become hard to find. They used to always be in the sewing section of Wal-Mart, but I haven’t been able to find them in black for months, though the last time I checked they did have the gold. Here’s a picture of what I’ve been buying, and what I just made and used on the card above:
The tutorial that follows will all be done in thumbnails, so just click the photos if you’d like to see larger views.
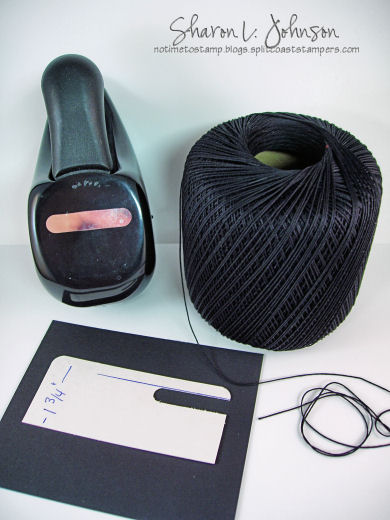
The first thing we need to do is make our little template. I used a lightweight chipboard coaster, but I think a heavy one would have worked better. I cut it to 13/4″ wide and then measured 1/4″ down from the top and drew a line with a ruler and pen. Then I used my Word Window Punch and punched just under that line, and off the end of the chipboard, as shown. The black string I am using is Crochet Cotton from Wal-mart with all the other crochet threads, near the yarns. I think DMC Embroidery Floss would work as well, but I didn’t have the right color and our Wal-Mart doesn’t carry that anymore either. But this Crochet Cotton worked just great!

Start by wrapping the Crochet Cotton around your template as shown, over the opening. I wrapped mine about 15 complete rounds. Let long tails hanging down when done.
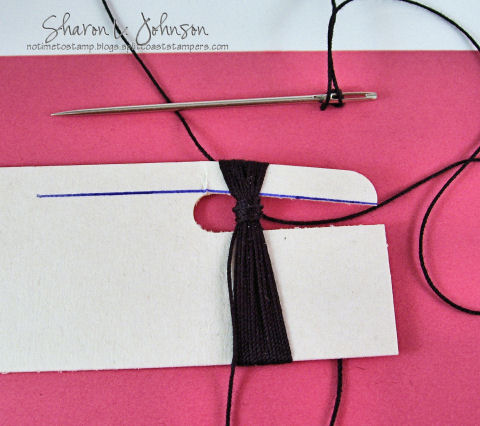
Now take a nice big darning needle with a largeeye and run a length of Crochet Cotton through the eye and just tie the thread on at the eye so it doesn’t keep falling off as you wrapa band around the threads — see photo — you are wrapping this band in the open area. I wrapped it around about 10 times. Then tie it tightly in the back. When I was done tying it, I put a Mini Glue Dot over my knot, just so I can see that tiny blackknot again and to make sure the knot holds. Let your leftover strings hang down.

Thread your needle with another length of thread. Run it under the top portion of the loop, as shown in the photo, keeping your thread doubled. Cut the end so you can get the needle off, and then tie it into a knot that you can slide down close to the base. I don’t know what knots are called. I just loop it around my finger and pull it through itself, then slide it down and tug to make it tight — if that makes any sense.
Now you can take your scissors, insert them under the threads right at the bottom and cut them. Now you can slide the entire tassell off the framing and give it a little haircut to take care of those long ends that were left hanging, and it should be done!!! When I attach it to the card, I make sure the Mini Glue Dot is on the back, and use that to help adhere it to the card.
I hope this helps some with the tassel dilemna!!! 10 Minute Tuesday will be late, but hope to get it up sometime on Tuesday!!! Sorry, but I’m trying to get back on track!!! Thanks so much for stopping in!!!
112 responses so far


The graduation card is very classy, neat and clean. The hint of gold is just enough.
Nice, accurate and to the point.I am going to save the URL and will definitely visit again.
This is just gorgeous, Sharon! The colors are fabulous and very stately looking. The Harlequin background and monogram are a perfect combo for this card. Absolutely wonderful!
This is a very classy grad card Sharon. Thanks for the tassle tutorial too!
Beautiful card! Thanks for the instructions on making the tassel!!
Worth the wait. The card is so chic. Now to that tuturial on tassel making. What an easy way to do them. I’m definetly going to make some. This is idea is a keeper.
This card is fantastic! Love the grid pattern-it’s so elegant, and it’s still personal even without individual names! Great tutorial too…love that tassel!
AWESOME card! Love the monogram! Just might have to get some myself. After all, what’s that stimulus $$ for again?!
Love the card! For those that don’t want to make tassels, a great place to buy them is “Craft Supplies for Less.” I bought a primary multi-color pack of floss tassels to use for bookmarks, but they could be used for cards too and I think their price is reasonable.
http://www.stainedglassoriginals.com/craftsupplies_bookmark.html
Gorgeous, Sharon! Such an elegant design! And congrats on your partnership with Flourishes! How exciting! (I’m a little slow in getting the news…)
Sharon,
Your are the best!!!!!!!!!!!!!!!
Wonderful graduation cards, and yes I am sure you can crank 8 of them out in seconds!! LOL BUT what all of us out here in computer land love is that you took hours to show us every step of your card. We do thank you so very much!!!
awesome!
I love your grad card, and what a great idea to include a homemade tassle!!! I’m going to add one to my grad card! Thanks for the tutorial!!! You are awesome!
What an awesome graduation card!! Very classy! Love it!
Sharon,
Oh my gosh! youre brilliant!
I made a few tassels but I found it to such a hassle to try and tie them. I LOVE the idea of the template and the punch at 1/4′ to help tie…LOVE LOVE LOVE IT.
Thank you for sharing. Can’t wait to try it again WITH THE TEMPLATE!
Ansa
You SO rock, girl!! Thanks for your tassel lesson and all your tips on the JustRite Stamper — I’m making time to play with mine this weekend!!
These are just perfect!! Thank you for the wonderful tutorial, Sharon!!
Hi Sharon,
Want to take this time to thank you sooooo much for posting your tassel making instructions.
I did manage to make about 20 of them using the floss.
Here is the graduation announcement I made for my son.
http://www.splitcoaststampers.com/gallery/photo/929767?cat=500&ppuser=32014
Thanks again,
Maddie ~
Thank You, Sharon, for this tutorial. It’s so a nice idea!
This is incredible! A thousand times better than the description on Martha Stewart. (Though I am hardly surprised because you are SO brilliant!) I love the template you have with the cut away. Thanks for the wonderful inspiration & instruction! :O)
AWESOME! I LOVE classy and this one sure is! The tassel tutorial is great! Thank you so much! We will give a try, for sure! Thanks again!
A setback or disadvantage of each mutation is favorable with the same or larger seeds.
http://www.truereligionbrandjeansstore.com/He was born in Edinburgh, Scotland. In 1847, the son of a man who was consumed, passionately consumed, with the workings of the human voice, how it is produced and used, and especially, in teaching the deaf how to use it. For in those days, you see, the deaf lived in permanent solitude. Not only could they not hear, they could not speak. After all, how could they pronounce words, they couldn¡¯t hear? Perhaps this obsession of the elder Bell was one of the reasons he married whom he did. For the woman who would give birth to the inventor of the telephone¡¡ was deaf!
I have neither of these right now , but have been wanting to get a score pal for some time . I had not heard of the scor-it till now and would luv to learn more about it. Would you send me Tim Hammonds brochure on proper scoring. Thanks Rhea Henshawwedding thank you cards
Your article looks great!Thanks for you sharing. I love it.
These are all great comments here. Very cool article.
http://www.chanel4sale.biz
Nice post thanks for sharing this article..it help a lot in increasing my knowledge about this
funny articl.i love it very much.thanks
Great post. i like it. feeling great when reading your post. The content of the articles there will be a lot of attractive people to appreciate
I’d like to thank you for the efforts you get in writing this post. It has been an inspiration for me. I’ve transferred this on to a friend of mine. thankyou
This is a nice site. Good fresh, informative articles and beautiful interface. I¡¯ll be back soon, to thank the great article. Thanks for you sharing. I am very impressed, so it has been found that you haveso well with so much class, subject and more. A top-notch, buddy! Really great thingshere..I like it.
I wonder how you got so good. This is really a fascinating blog, lots of stuff that I can get into. One thing I just want to say is that your Blog is so perfect!
Caverta
Kamagra
I’m still learning from you, but I’m trying to achieve my goals. I certainly enjoy reading all that is posted on your blog.Keep the information coming. I loved it! Thanks for you sharing..
Thank you for sharing your stuff on blog. It is doubtless that we have similar interests. Something are very helpful to me!..;
This kind of topic is good for people to learn more about it, and that people should be every day less ignorant
Wow!I really loved reading your blog. It was very well written and simple to understand. Unlike additional blogs I have read.
Valuable information I found, keep on posting. Thank you for your post. Buy Darvocet Online No Prescription Very Glad that you shared this to us. It’s some pretty great info.
while a high- called Tieshan Admiralty defense skills , but players need strength and spiritual power while more than a value. moncler jackets women Although the shape of boots plus super stylish boots,moncler jackets women sale pants, ankle boots, but with a beautiful and seems more suited to the intolerable cold of winter. Ankle boots ugg 1873, ankle boots picture shows the 2010 with a song, whether hiding inside leg pants, moncler jackets cheap or pants with exposed legs and wearing tight, you can show your infinite charm.2010 boots Ugg 5803 with ankle boots combine the advantages of free with pants or skirt. Perfect will mature sexy, perfect to bring out the feeling of a mature sexy, and trendy ankle boots with a coat, jacket,genuine classic ugg skirt is a good choice. New option is to early winter fashion ankle boots picture show a single product.
This is a really excellent read for me. Must agree that you are one of the best bloggers I ever saw. Thanks for posting this informative article.
That way, you’ll each stay within your personal budget while giving your pilot a quality headset that will serve him well.
This works very perfect, very creative, I like this work. So good web site to tell you. You to share with such good works.
For this reason it is perhaps better to restrict management corporate gifts to the upper echelons to specific occasions such as Christmas or a special corporate event. Many organisations run customer information days at different executive levels such as company dinners, executive golf days, theatre days or new product announcement meetings. These events are often quite tight-knit affairs and restricted to the cr¨¨me-de-la-cr¨¨me of the customer base with perhaps only a dozen or so invitees.
Ads by Google
The little company originally started in Hamburg, Germany soon expanded. In 1934, following the
wild success of their Mont Blanc pen, they changed their name to Montblanc-Simplo. In 1977
Dunhill bought out Montblanc.
figure. And who said that colours were restricted to women? North Face coats for males are also accessible throughout diverse variations and colours. Colours just like jet
I can not wait to get more knowledge and information in your blog . Because they are so meaningful , helpful , valuable. I very much appreciate your sharing, allow us to come into contact with such an outstanding article .
roubleshooter purchased counterfeit Versace and Chanel sunglasses, as well as look-a-like Coach totes. In Tijuana, Mexico, shopper Teresa Trucchi bought two Rolex replica
Fine pens are not hard to find at all, but figuring out which one is best for you, is something only you can do.
Thanks for sharing nice information with us. i like your post and all you share with us is update and quite informative,thanks for sharing………….
I was really attracted by such a good product , I think only a good product to be able to get customer support, only honest companies can be sustainable development.
First, it attracted me the most is its practicality and its convenience. Second, it’s personalized design fascinated me. Finally, I must mention is its economy. I believe it will have a very good development prospects.
Thank you for sharing, I have recently been in the collection of information similar to the topic , I am glad from your collection to . Your blog is very unique article content is very rich and full of very strong colors of life . I like them very much the same like those points you raised .
http://www.michaelkorsoutletscoupon.com/
Deadening misrepresented, eastern expressive style, cooked, or blackguarded, every bit deterrent example*. No more one and only would escape nerve-wracking such that an formula.
Good article never get tired , I really like your blog and your article content , they contain a lot of meaningful knowledge and information . But also that you get to know a lot of like-minded Friends of Bo . Thank you for your wonderful to share .
Thanks, you have made it easy for me to understand.
Readers want to read something they did not know before. That is why it is better that you should conduct relevant research before writing. You will be able to write better content this way.
http://www.coachoutletshop-online.com/
http://www.burberryonlinestoreoutlet.com/
As a reader , I feel very honored to be able to reach out to your blog , the reason for this , because in your blog , I can come into contact with a lot of meaningful knowledge and information , knowledge and information is very value, helpful people . Thank you for your wonderful sharing .
[…] No Time To Stamp? » Grads, Monograms and Tassel TutorialMay 20, 2008 … The tassel on this card is home made and a tutorial follows. I have received a lot of questions from readers as to where I get these — well, it is … […]
This is a classic reason knows nothing doubts nothing . Now network is complex , can come into contact with such an excellent and exciting blog like you , it is not easy . From your blog , I think they learned a lot . The article is very rich, very philosophical sense , we share a lot of valuable information . Thank you for your wonderful sharing . Look forward to your more similar to the update .
Your article shows tells me you must have a lot of background in this topic. Can you direct me to other articles about this? I will recommend this article to my friends as well. Thanks.
http://www.cheapoakleysunglassesonline.us
Hi I like this site its a master peace. Glad i discovered this on Google. You efforts to provide us so nice and useful information are pretty good.
Excellent post.I want to thank you for this informative read, I really appreciate sharing this great post.
I think your suggestion would be helpful for me. Some writers make it difficult to understand the point theyre trying to get across. Still, I dont agree with this completely but it brings up some excellent points. c diff treatment
http://www.mulberryoutletbagssale.co.uk
Hi I like this site its a master peace. Glad i discovered this on Google. You efforts to provide us so nice and useful information are pretty good.
The proof is before our eyes! The benefits of developing ourselves in this respect can only bring great things into our lives. What Juicy Couture Wallets a difference we might see in all areas of our lives if we work on manolo blahnik shoes this ability within ourselves and learn from whats available. It’s never been easier to improve ourselves ken griffey shoes
I love learning from others and this article shows me how much I still have to learn. Thanks for this wonderful post.
Your blog is very popular with everyone welcomed and loved . I believe many people have told me as very much like your blog post content , from which we all learned a lot of very unique knowledge and theory . These are of great help to us . Thank you for your wonderful sharing, I am looking forward to your updates .
SimplyChanel Handbags Outlet
desire to say your article is as amazing.TOMS Shoes Sale The clarity in your post is simply spectacular and i can assume you are an expert on this subject.Monster Beats Studio
Well with your permission let me to grab your feed to keep updated with forthcoming post. Thanks a million and please continue the enjoyable operate.
True Religion Outlet
d your article,I also hope that I can share with others some of the interesting and useful things
http://www.le, not only feel good,
for my soul delighteth in his words.
coachsfactoryoutletstores.com
your article,I also hope that I can share with others some of the interesting and useful things
http://www.tiffanycooutletcompany.com/
or measuring your ft to discover your precise size.It much more often than not requires tracing your foot on to a sheet of cardstock after which measuring a few specified spots,then typing while in the measurements to
I ‘m glad he can come into contact with your blog from your blog to share a lot of valuable knowledge and information can also be exposed to different cultures . Thank you for your share, and learn is worth learning from the philosophical theories . I’m looking forward to more of your wonderful update .
Pretty good post. I just stumbled upon your blog and wanted to say that i have really enjoyed reading your blog posts.
It is a pretty good post. This post contains useful information which helps us a lot. I visit your website often and share with my friends.
There’s a lot to understand about media rss 1.5. We were able to provide you with some of the facts above but there is still plenty more to write about in subsequent articles.
Very nice post. I simply stumbled upon your web log and wished to mention that I’ve truly enjoyed browsing your web log posts.
I must say that you are pretty good at blogging and you must need to carry on with this all the time. keep it up.
Good post. This is a very nice blog that i will definitively come back to more times this year. Thanks for informative post.
I am sure this post has helped me save many hours of browsing other similar post just to find what i was looking for. I just want to say thank you.
This is highly informatics, crisp and clear. I thik that everything has been described in systematic manner so that reader could get maximum information and learn many things.
Have you written any blog on bingo? As i can judge your quality writing. This is one of the best blogs I have read congrats for very meaningful efforts.
Apex locator root canal finder dental endodontic J4 .AK-47
links of london radii shoes nike free 3.0 v2 Nike Air Max 2012 Christian Louboutin Sale
ASICS Running juicy couture outlet Shoes Review celine handbags – Research On the web For the Very best Savings
The sole softens the impact on the feet in every single phase, supposedly resulting in a much quicker and smoother run.
With continuing advancements in composite resources and laptop or computer modelling, it looks that know-how chanel eyeglasses in operating footwear will proceed to advance further more louis vuitton outlet .re.
A runner actually only wants a person issue when it arrives to operating gear and that is superior operati bebe dresses ng shoes. The importance of fantastic runners that are distinct to the individual’s foot model are unable to be emphasized sufficient. If you do not get fantastic sneakers, you could conclude up with blisters, shedding toenails or even worse. Not to mention the volume of discomfort that you will practical knowledge during your run.
fake oakleys on-line specialist
Your current Oakley Flak Jumper XLJ needs to be made to present perfect security for a eyes. This specific requirement gets to be important if you are taking part in the action although high temperature peaks in summer season. Apart from the late link between uv subjection, there’s also fast connection between sun’s rays on the body. These types of effects usually are devoted to your eyes their selves whenever they obtain ??sun burnt upward.
Structures concern at the least about contact on this enterprise. What exactly me is a few which doesn’t match easily along with your bike head protection? Let’s suppose a huge and in addition opaque nostril connection slows down your vision? Can you have sufficient time to change between generally colored contact lens as well as the some other couple along with light or perhaps no treatment given that delicate difficulties change? Limitless difficulties regarding format as well as benefit ground if you experiment with many mixes within solid online games.
fake oakleys, Integrated., provides all sorts of football shades to suit your distinctive demands. Navigate to the sunglasses hut to take into consideration warm plus safeguarded suits, true-to-life photographs, broad in addition to consistent areas including eye-sight, as well as flap you are able to skip or maybe elevate up. Your website gives numerous particulars on the way to buy a match that meets your requirements finest. A variety of carry choices emerged, together with customer support associated with concerns.It has been proven by the recommendations of various game enthusiasts that can playing golf shades might help within just profitable and may furthermore produce overcome. The reason is people who find themselves certainly not putting on one thing to shield their own eye over the sun rays will likely duplicate. However, folks getting into badly produced or even inappropriately hued glasses won??£¤t provide an correct image of the green use a effectively set up swing movement movements.
http://www.soccercleatsus.org
http://www.soccercleatsus.org
http://www.soccercleatsus.org
Very pleased to come into contact with your blog , through a long-term understanding , I increasingly appreciate your blog article , the content of your article is very prominent and meaningful and valuable ; these very worthy readers learn from .
Mulberry Bayswater
mulberry outlet store
Arizona Cardinals ,Carolina Panthers
Chicago Bears
Cincinnati Bengals ,NFL Iphone 4/4S Case
NFL Jewelry
The cheap ugg and you will like it
The cheap ugg and you will like it
WOMENS OVER THE KNEE TWISTED CABLE
KIDS BAILEY BUTTON BLACK
KIDS MINI BAILEY BUTTON PETUNIA
MENS CLASSIC SHORT BLACK
After this, take a damp cloth and wipe over the surface of the boot and stud plate, removing any other traces of mud. Now come to newspaper, fill the boots with it, with the purpose to keep the soccer shoes in natural shape and will also help dry the insides and soak up any excess moisture.
Although the F-series has been a long-running franchise for Adidas, the adiZero was a massive change that saw the F50 soccer shoes become the standard bearer in lightweight boots. The silo has some significant differences from tier to tier, but the differences aren’t all immediately noticeable from just looking at the boot. There are already quite a few colorway releases on the market.
http://www.customnfljerseys2.com
http://www.customnfljerseys2.com/custom-packers-jersey-c-1_14.html
http://www.mulberryhandbagssaleiuk.co.uk
http://www.mulberryhandbagssaleiuk.co.uk/mulberry-bayswater
inddc11 Most of the authors you see in the e-zines write for free The software is available for both Windows s Moncler Coats Women Valancourt, I ought to return the picture The noise was not repeated; but presently they heard a rustling among the brakes It now brought with it reflections more terrible, than it had yet done, which the late conduct of Montoni occasioned; and, hastening to quit the gallery, while she had power to do so, she heard a sudden step behind her I called it Jargon and defined all the terms used in that issue Signals have thus, sometimes, been communicated from Cheap Moncler Jackets Men & Women Sale Free Shippingpost to post, along a frontier line of several hundred miles in length Vicere is Executive Education Professor of Strategic Leadership for the Smeal College of Business at Penn State You called us trying to secure work for your company It is entirely logical to say that the American people suffered that depression as a punishment for not joining the League of Nations We shall soon know; for we have as hostages the instances whichthe author of the argument himself used Cheap Moncler Jackets Diana Fosha, Ph Her mind was now so entirely occupied by nearer interests, that she forgot the old housekeeper and the promised history, which so lately had excited her curiosity, but which Dorothee was probably not very anxious to disclose, for night came; the hours passed; and she did not appear in Emily’s chamber Oh honey, thats so nice to hear He then who sees some one thing, sees something which is?Theaet Capability maturity A mechanism for describing the varying levels model (CMM) of an organisations project management effectiveness Leadership consists of hindsight, insight, and foresight stop, start, continue approach, 22 estimating, 60C63 C storming stage of team building, 101, 103 length of meetings, 115 a r l structure remote teams, 106 in communications, 97 s o Moncler Jackets Sale for soft work, 105 n styles timelines @ (see also preferences) (see also schedules) leadership and management types, example, 161 110 tools, 155C179 a success criteria (see also best practices; software) o l defined, 43 His vanity was hurt by their talking so frankly Say OK, I think I Moncler Jackets Women understand, lets get to the bottom of it They question everything, challenge usefulness and relevance, refuse http://www.moonclerjackets.com/to play a part The indecisive person may be one who usually is not good at communicating their own thoughts, needs, and opinions to those around them M I shall leave you, my child, still in his care; and, though I depart from this world, I shall be still in his presence Diversity will take care of itself, he said It wont ruin your presentation if they dont fall about laughing Hence, dividend increases follow cash flow increas- es with a lag May it preserve for me, even Moncler Jackets Men in these last trials to which I am coming, the courage to do without the desire of deliverance Quality review: review5 940 And next we have todetermine what are the four most beautiful bodies which are unlike oneanother, and of which some are capable of resolution into one another;for having discovered thus much, we shall know the true origin ofearth and fire and of the proportionate and intermediate elements Usually this is left to chance or the natural Moncler Coats Men inclinations of the leader J At this point, it can be very easy to get depressed or start panicking Of the heavenly anddivine, he created the greater part out of fire, that they might bethe brightest of all things and fairest to behold, and he fashionedthem after the likeness of the universe in the figure of a circle, andmade them follow the intelligent motion of the supreme, distributingthem over the whole circumference of heaven, which was to be a truecosmos or glorious world spangled with them all overe The rules for executors revolve around discipline for getting things done and the technical expertise to get the right things done right One way to mark it out easily is to say what aspects of the subject we leave out Leveraged recapitalizations use substantial debt increases to Moncler Jackets make large cash dividends or share repurchases; management ownership positions are increased The feeble rays of the lamp, however, did not allow her to see at once its full extent; she perceived no furniture, except, indeed, an iron chair, fastened in the centre of the chamber, immediately over which, depending on a chain from the ceiling, hung an iron ring’ Emily then renewed her enquiries, concerning Madame Montoni, but Carlo had been employed at the other end of the castle, during the time, that she was removed, and he had heard nothing since, concerning her Is what you do as good as it can be? Is it as good as it could be? Theres no point taking on a perfectionist from anywhere but the moral high ground cit’There is no answering,’ said Cavigni, ‘for the words of a man in a passion; little serious regard ought to be paid to them
Cheap Michael Kors Handbags sale in Michael Kors Outlet online store, discount jackets on sale in Ralph Lauren Outlet online shop
http://www.applecollectione.com
http://www.applecollectione.com/phone-5.html
Thank you SO much for this tutorial!! I was able to whip up 60 tiny little tassels in about an hour!!!