Sep 08 2008
Gift Box and Ornament
I made a project today that I am totally happy with — quick, simple, clean, fresh and something I can use for a gift!!! I was cruising Tammy’s blog earlier today, saw an adorable box/bag type thing, clicked the link and found a fabulous site I had never been at before — the 3-D Design Challenge Blog. How fun!!! A challenge was issued to create a One Sheet Box and a printable template was provided. This was one of those times when I just had to drop everything else and do it!!! I LOVE this little box — SO quick and easy — and just adorable!!! I know I’ll be making a lot more of these. I added a rounded top to my box, but it’s the same template, and then I made an ornament to coordinate with and put in the box. Here they are:
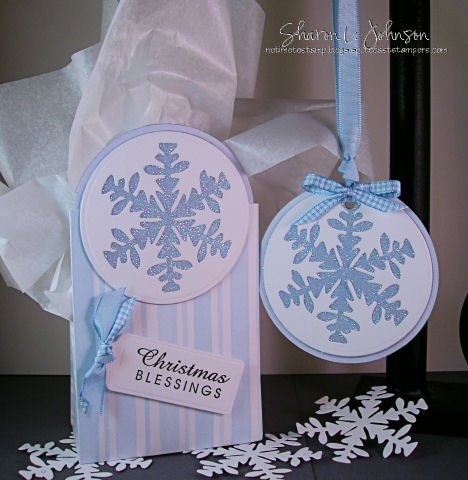
The box is made using a full 8.5 x 11 sheet of paper. I followed the instructions exactly, except I did NOT score those diagonal lines for the corner folds. It was much easier to just fold it in my hand, easily lining it up, then crease that inside fold with my fingers. I then used tape to secure all those folds on the inside of the box (between the layers of paper). Adorable box!!! (Editing: I used a thinner DP that was 1 sided with a white back. The thinner DP allowed for crisp folds in the corners.) To decorate the box I decided I would make a large snowflake for the topto round it off and give it some extra height and stability. Once the snowflake was made, I thought it looked like an ornament so, there you go — a box AND a gift!!! Here’s how I made the snowflakes:
-
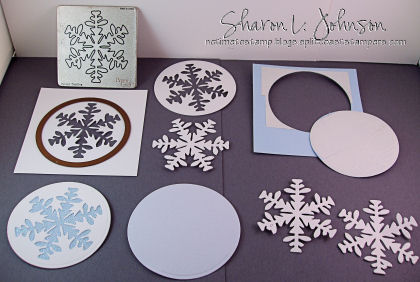
Using the Cuttlebug Ice Crystal die on about a 4″ square of white c/s, run it through and cut. Press out the snowflake and save for another project. We are going to use the negative part for this project. (Editing: I ordered this die from Jacksonbelle Embellisments, and to my surpise when it came there is ALSO a folder, same design, in the pacakge!!)
-
Using a Circle Nestability, center it over the negative snowflake, cut and emboss.
-
Using SU Bashful Blue c/s, apply double sided tape to one side, and using the same Circle Nestieas above to cut the snowflake, cut out the circle. It will have tape on one side. Those of you with Xyron’s large enough, could just run these through the Xyron instead. I just don’t have one.
-
Now take your circle negative snowflake and adhere it to the Bashful Bluecircle above, on the sticky side. The sticky tape will be exposed in the snowflake opening. Sprinkle with fine glitter. This technique is called a Glitter Window, and instructions can be seen on this SCS tutorial.
-
Using Prism Iced Cobalt, cut a Circle with the Nestability Die just a bit larger. This Iced Cobalt circle serves to frame the snowflake. When adhering to the box, the snowflake is on the front of the box front, while the Iced Colbalt frame is on the back of the box front, so the box appears finished both inside and out. Make 2 of these — one for both the front and back of the box. Here’s a good look at the box:
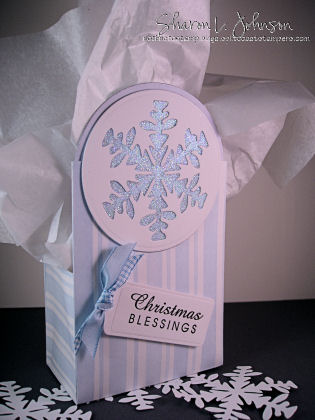
I just added a little tag with ribbon trim. The tag was cut and embossed on the Spellbinders die called Tag 5. It cuts 5 tags at a time — I like it a lot. These tags are a bit bigger than the other sets of Spellbinders tags I have, so it allows for sentiments a bit larger.
To make the ornament I made 2 more of the snowflakes and sandwiched the Iced Cobalt Circle in between them, punched a hole with the Cropadile punch (gosh that thing works great for going through so many layers!), then ran my ribbon through the hole. Done!!!
-
Stamps: Star Studded Season by SU
-
Paper: PTI White, SU Bashful Blue, Prism Iced Cobalt, very old DCWV Spring Stack DP
-
Ink: Versa Fine Onyx Black
-
Accessories: Cuttlebug and Ice Crystal Die, Petite Circle Nesabilities and Tag 5 by Spellbinders, Double Sided Tape or Xyron, SU Dazzling Diamonds, Cropadile, SU Ribbon, Dimensionals
That’s it for this project! I’m sure you’d LOVE this box, too — give it a try. Once you do it once and figure out the corner thing, it’ll go together in just a minute or two — truly that simple!!!
See 2 posts abovewith a Contest to Enter and more Blog Candy links!
Thanks for stopping in!!! Are you getting tired of the party yet — LOL!!! We’re about 1/2 way through!!!
34 responses so far


Sharon, its beautiful, and so are your for sharing all of the how to’s.
I love your snowflake ornament and box.
This box is so totally cool!! I love it! Thanks for all the details too, you are always so good to share every step – Thanks so much!!
Sharon, your box and ornament are so pretty! I love the soft blue and white color combination.
I can’t believe your party is still going on – I love it! That box is so neat. I am off to check out that blog now.
This is ssssweeet! well done! I’m technically challenged to read directions tho, sadly
Wow, that is such a sweet box and I love the little ornament to match. Perfect!
Beautiful box…so elegant.
[…] bookmarks tagged tammy Gift Box and Ornament saved by 3 others HatakeAyumi bookmarked on 09/09/08 | […]
This is so AWESOME an idea for Christmas decorations and small gifts! I just used a round disc to make a dishwasher clean/dirty sign and was thinking I should make some ornaments with some … thanx for the inspiration! Whoo hoo!
How lovely is this! An ideal small gift/Christmas decoration combination which I shall be attempting very soon. Thanks for the link!
Marion, UK
This box is gorgeous. Thanks for sharing.
Love your project! I now have to go find that die and make some ornaments myself! :o) Thanks for the inspiration!
oh so gorgeous!! I’ve not seen that Cuttlebug snowflake die cutter until this post! That’s really exquisite! What a beautiful gift set you’ve created with it, and oh those dreamy soft colors! Love it Love it!!!
I love the snowflakes and the color you went with. So soft and pretty!
Gorgeous!!! I’m a HUGE fan of snowflakes! ð
Is it snowing outside? It sure feels the holidays when there are super fantastic projects like this being done! Thanks so much for playing this week at 3DDC – we hope to see you again.
Sharon, this is simply the best! I saw the site linked yesterday on Tammy’s blog and didn’t get a chance to check it out due to getting ready for my giveaway today . . . LOL. I’m headed over to check it out, thanks for the link.
So pretty! I always love snowflakes designed in blue!
This project is so pretty. Thanks for the instructions too. I’m going to have to try this one for sure.
Absolutely gorgeous Sharon!!!
Sharon, your box is so pretty and classy. I love the snowflake. What a great little gift. Great job!
Joan
Ooooo..how beautiful! Thanks for the inspiration!
Just LOVE this little box!! You’ve done a fabulous job on it – classy looking as always too ð Going to have to try one of these myself.
Oh how I love it!!! And here in Michigan snowflakes are good all winter long – not just for the month of December. *lol*
WOW Sharon, this is awesome! Absolutely gorgeous! Thanks for playing with us at 3DDC. Hope you will be back for more!
This is a GORGEOUS set!! tfs
so very pretty!!
Love it!! What a great idea for a gift – bag & ornaments all in one!
Congrats in making the top 3! Your box and ornament are just beautiful!
Hi Sharon, your christmas 3D and ornament is so cool. Congrats on being the Top 3D.
This turned out so beautifully, Sharon! And I’m so glad to have been able to enable you with the pattern! ð
I just love your ornament and box. It is very beautiful. Thank You so much for sharing.
I usually dont post in Blogs but your blog forced me to, amazing work.. beautiful