Sep 27 2008
Sew Simply Bathroom Perk Up!
Today I’d like to share a super quick way to perk up your bathroom! Using purchased shower curtains I made a new window valance alongwith adecorative shower curtain and valance. I spruced upa wall with a stamped item that I made 2 years ago, and I filled the room with the aroma of sweet smelling potpourri!!! My bathroom is sparkling clean, fresh smelling and just calling me to take a long, hot bath with a good magazine!!! I’ll start with the wall decor:
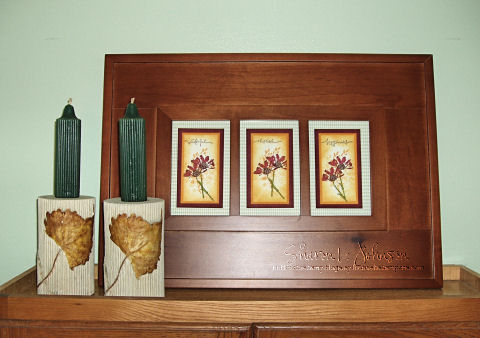
I made this framed item2 years ago as part of a contest being run at the Limited Supply Challenge at SCS on Labor Day weekend. When made there was a small framed piece to coordinate and several cards, but they have all since been given away. This piece has never been used, so I figured it high time it have a place of honor on a wall — and it’s place of honor is, appropriately, above the throne — LOL!!! Actually, this sits on top of the cabinet above the toilet. I made this using SU Petal Prints. You may see the SCS uploads for this piece and all the coordinates here, and here, here, here, here, here, and here.
Next I’ll show you the window valance, and if you can sew 3 straight lines, you can easily make this valance for any window in your house!!! If you can sew on a card, you CAN make this valance. Here it is:
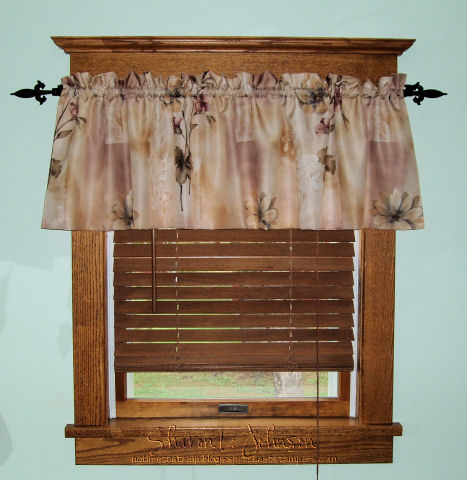
Making this valance is Sew Simple you won’t believe. There is a tutorial at the end of this post.
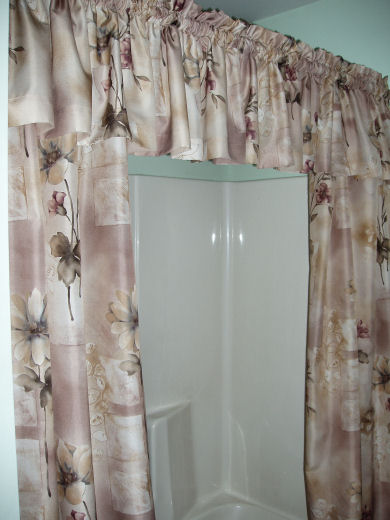
Next I made a decorative shower curtain and valance. This was really hard to get a decent photo of asdue to the size/location of the shower within the bathroom I could not get far enough away to capture it all, but I hope you get the idea. I use 2 rods to accomplish this. The decorative side panels hang on a double rod. What you do not see is the shower curtain that actually pulls closed when you shower. That is hung on the inside hooks of the rod and is tucked behind the panel on the right. The decorative panels you see do not close. They are there merely for appearance sake. Then a bit above this rod I have a tension rod on which the valance is hung. Instructions will be at the end of this post. Here’s the pic:
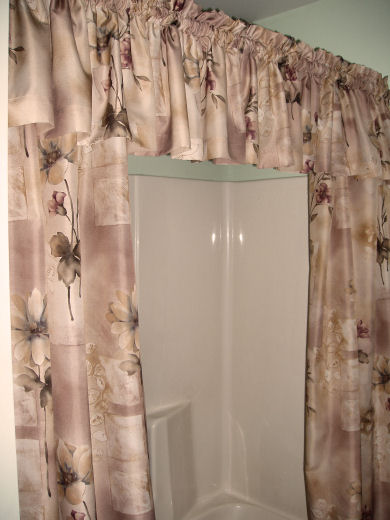
This photo of the shower curtain reflects most accurately the true color of my bathroom walls — a very relaxing sort of seafom green. And here’s where the sweet aroma comes in:

Do you recognize the monogrammed gift bag of potpourri from this post the other day? I won’t keep the monogrammed bag of potpourri on my counter as it is a gift item, but I just displayed it here for the photo so you can see how lovely the potpourri looks when contained in clear glass — love the natural and earthy look it brings to the area. And that’s another idea if you want to add a bit more to your gift bag of potpourri — include a beautiful class container for the potpourri!!!
OK, now that’s it for my squeaky clean, sweet smelling bathroom perk me up. On to the instructions. To do my window and shower as pictured, I needed to purchase 3 shower curtains. Shower curtains work perfectly in the bathroom — they are a great weight and texture, they wash, wear and hang well, and all done in prints well suited to a bathroom!!! Your choices really are much narrower than shopping in a fabric store, and that’s a good thing — makes it easier to decide!!! Plus, by using a shower curtain, a lot of the work is already done for you, as you will see below. I got these shower curtains from Shopko. They were $35 each at full price, but I got them on a good sale, which is also a good thing!!!
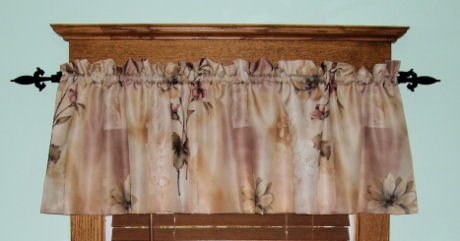
My Sew Simply trick for today is how I did the window valance. Now, had I just made my curtain using 1 thickness of the shower curtain, hemmed the bottom and made my casing for the top, my curtain would have been rather *see-through*, and I don’t like that. I most often line my curtains so avoid that issue, and I make all my valances so they are self-lined. Basically, I make a tube, resulting in an automatically lined valance. Here’s how:
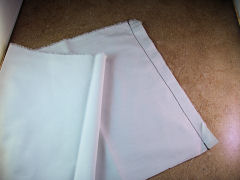
For the size of my bathroom window, one width of shower curtain works perfectly. Neatly cut the plastic part with the holes for hooks off the top. Measure down and cut so you have a 36″ longpiece. This is what you are working with, and see how your sides hems are aleady done for you? Very cool!!! I’m using a piece of white fabric with black stitches on my examples just so you can easily see.
Photo 1: Bring your raw edges together and sew with about a 1/2″ or 5/8″ seam, thus creating a huge tube.
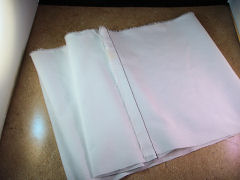
Photo 2: Iron the seam down against the back side. So what is the back side? Well, on a plain piece of fabric it doesn’t matter. But on a print, you must pay close attention.When making a tube, one side will be the right way, and the other side will be upside down — look at my floral pattern. See how the flowers/stems are the right way — well,the flowers/stems are upside down on the other side.
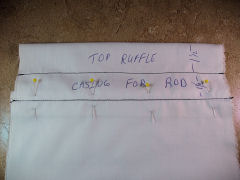

Photo 3: Turn your tube right side out, so the seam is on the inside. Measure 3″ up from your seam line. This is the TOP of the curtain ruffle. Adjust it all nice and straight so there is a consistent 3″ from the seam line to the top of the curtain. Pin as shown so it’ll stay in place. Now, machine stitch justa hairabove the seam line, or experienced sewers or quilters would stitch-in-the-stitch. Run a second line of stitching 1 1/2″ above this line, which would also be 1 1/2″ from the top. That’s IT. Your sewing is done!!!
Photo 4: Take your valance to the ironing board and press neatly, getting a nice crispedge at the bottom (hem) and top (ruffle). Insert rod, hang, neatly adjust ruffles evenly on rod and admire!!! (That’s the fun part!!!)
Now on to the shower:

This valance was made in a more traditional fashion as I was not concerned about the sun shining through it and making it look too flimsy. There is no light coming from within my shower! To make this I needed 2 widths of the shower curtain sewn together. Start with another new shower curtain, as you won’t have enough with the one you’ve already cut in to. Again, remove the upper plastic band with holes, then cutyour piece23″ long. And cut two pieces that size. Sew them together on the short edges so you have one very long piece.
Rod Pocket and Ruffle: My tension rod is quite thick around, so I needed to make my rod pocket 2″, so I also increased my ruffle to 2″. At the ironing board press under 1/2″ along the top long edge (again, be mindful of the direction of the print pattern). Now fold the top down 4″ and pin in place. Sew down along the pressed edge, and then run another stitching line 2″ up from that, which is also 2″ down from the top. You have just created the rod pocket and top ruffle.
Hem: To hem your shower valance, press up 1/2″ at the ironing board, then turn up 2″ and stitch into place. You are now done!!!
Shower Curtain: To make the decorative side panels I merely cut the 3rd shower curtain straight up the middle and hemmed those cut edges to the same width as the factory sewn edges so they match. You will have 6 holes on top of each for hooks. Hang them up and your projectis completed!!!
I know I’ve strayed a bit from the usual card making posts, but I’ve been cleaning and sewing, so just thought I’d share. I have sewn my entire life, but much LESS so now that I’ve been making cards — LOL!!! Can’t do it all – but I surely do enjoy a small sewing project from time to time, and it is wonderful when I can combine the two!!! Wishing you all a wonderful weekend — see you soon!!! Thanks so much for taking the time to stop in!!! Just wish I could offer you a cup of coffee — LOL!!!
26 responses so far


OH MY WORD~~~~~This is FABULOUS!!!!! Your bathroom looks wonderful Sharon. As you know I don’t own a sewing machine but man oh man between sewing on cards and now this…Maybe I need to get one:) Enjoy your family this weekend!
Can you come and live with us for a while? :0)
I loooooooove that fabric!!!! Gorgeous RR!
Oh, my! What a wonderful post! I totally loved this little home decorating interlude. Your bathroom is such a pleasant room for you, as I imagine the rest of your home is, as well. Don’t you just love it when it’s all fixed up and squeaky clean? I found this post very fun and interesting, Sharon. Thank you!
WONDERFUL- I can hardly wait to see it!!
wow, this is amazing….luv what you did with the frame, the shower curtain, and the smelling stuff, I luv the new wide ribbon….can’t wait to order it. *~*
You did a fantastic job with your “new” bathroom look. You’re a very talented lady, Sharon, and it shows with your great looking projects.
Oh my gosh, you have been one busy girl! I’ll say I don’t think I’ve ever seen a lovier throne . . . . LOL! You did a wonderful face lift for your bathroom, it does look so soft and soothing, very inviting! I’m glad you provided the links to your Petal Prints ensemble, I hadn’t seen that and it’s so pretty! Thanks for sharing and for the wonderful tutorial.
Wow, Sharon, your bathroom is so fabulous.
I ‘ve been looking for new shower curtains for my
bathroom and thinking I am going to have to do the same.
I can’t find the colors I want and guessing I am gonna make them as well.
I love your frame and potpourri set.
Your room looks so beautiful.The colors are gorgeous.
Sharon, how pretty!!! It sounds like you had lots of fun sewing and getting your bathroom all prettied up! It sure does look great and it always makes one feel so good to get things spiffed up. Thanks for sharing!
Joan
Very gorgeous work! Even prettier IRL!!! Your sewing creations are always TOPS– just like your card designs!
I am so glad you shared this, Sharon! It’s AMAZING! I am in awe! Everything turned out just perfect…absolutely beautiful! 🙂 Hope you are having a wonderful day!
Sharon, you are so talented!!! How do you find the time to do all you do?!!!
OK, now I know my coffee hasn’t kicked in yet… I kept looking for the part where you STAMPED the valance!!! Pretty bathroom. C’mon over to my place when you get a chance, LOL 🙂
Everything looks GREAT!! It’s so nice when you get a room “spruced up”.
Wow! I am so impressed. You not only did a fab job in your bath but you took the time to create this incredible post. thanks for sharing your great ideas. I am in love with the framed project too … now I’m off to visit my stash of SU stamps sets … hmmmm … do I still have petal prints? *lol* I want something similar in orange, yellow and green.
OM-GOSH! those curtains look EXPENSIVE! they are lovely :O)
thank you for sharing your creative genius.
I really do like the print in your curtains-so very pretty. Everything looks pretty and I like the Petal Prints project! Thanks for the sewing tutorial.
Wow, not only did you do all this but you have a tutorial, too! Fabulous!! I love, love, love your framed art and all the cards, too!!!
I will be referring back to your *Sew Simple* tutorial in future because my bathroom is in need of a makeover. I did make the curtains for the window and the shower, once upon a time, out of material by the yard but this looks so much easier. Now, if I can only find a color and design that will suit my *retreat* 🙂 Thanks for sharing!
Very pretty, Sharon…you are one talented lady! Do you want to come over and help me decorate for Fall? I love everything you design. I am so glad to see you used Petal Prints, it is a favorite of mine that I return to over and over again. I know this sounds goofy but I love your beautiful woodwork [ around the window] also. I love glam wood! Thanks for sharing all that great talent with us!
Ad K.
WOW, Sharon, your bathroom is beautiful!!! Such pretty colors and I love the shower curtain!!! OK, I need to make an appointment for you to come to Texas and work on mine…thanks so much for sharing!!!
Sharon, you really are a Psalms 31 woman…thanks for the inspiration. Beautiful bathroom.
What pretty projects!
And she decorates just as beautifully!! Why am I not surprised? *wink* Your bathroom is so lovely, and just so inviting!! Thank you for sharing it all with us!!
You have a great, informative, interesting and logical site. I would like to timidly make a male-oriented suggestion, probably because I just wrote an entry on the subject: males don’t like potpourri.
My wife covers the potpourri with an upside-down glass container when I am home. She’s very understanding.
You have a very impressive site, and you certainly know your subject!
It’s just a peaceful and no-cost decorating thing that you can do and it creates instant balance in your bathroom.Nice tips