Nov 12 2008
How to… on Boxes
Today I’ll show you how to create your own box to perfectly fit any little gift item you please. I get a fair amount of emails asking this exact question — “I want to make a box for this or that, and how do I figure how to cut my paper and where to score?” Well, if that’s something you’d like to know, keep reading — and fair warning, this tutorial is about as simple and basic as it gets. I am writing this to assume you have no clue where to start. I don’t mean to offend anyone with my simplicity, but I know many of you trulyhaven’t done this before and don’t know how to begin. This is written for those people. Once you learn this, you’ll have so much fun creating boxes, I’ll bet you won’t be able to stop!!! (I can’t!!!)
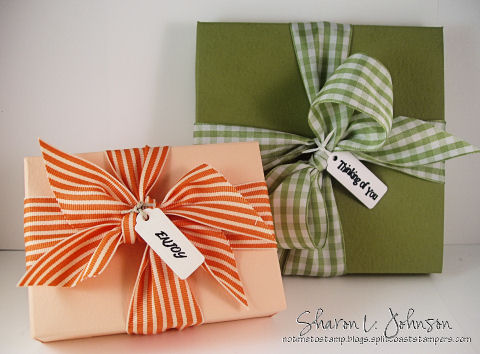
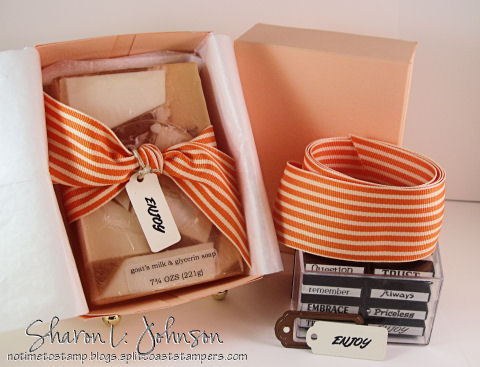
Above is the style of box I’ll teach you to do today. It is a simple base with a slip on cover. A very simple and elegant box design in my opinion. For today’s boxes, I just grabbed two items in my house that might be likely items one would purchase for a little gift — I grabbed a bar of handmade, scented soap and apackage of square, embossed cards from the $ Bin at Michaels. Here they are:
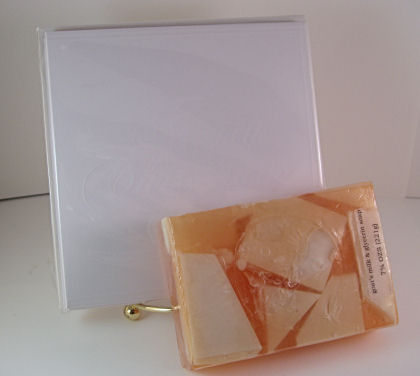
The first thing you need to do is determine the size box you need.We’ll start with the soap. You need to measure it. It measures 3 x 4.25″. I like my boxes with a little room inside for tissue paper, so I decided I want my box to be3.5 x 4.75″. That’s 1/2″ larger than the soap as to both width and length. Take a sheet of paper to write your notes and sketch your box.
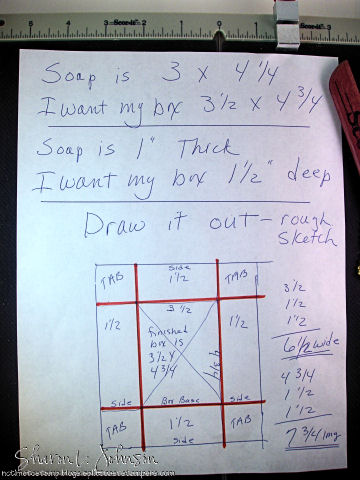
This is my worksheet. OK, we know the box is going to be 3.5 x 4.75″. But how deep does it need to be? Measure the soap. It is 1″ thick. Again, I want room to pad with tissue paper, so I’ll make my box 1.5″ deep. Now,sketch it outon your paper — it does NOT need to be to scale – just a rough drawing of a rectangle. Mark the shorter side as being 3.5″ and the longer side as being 4.75″. Again, this is NOT to scale. OK, now remember, we need this to be 1.5″ deep. That means our sides need to be 1.5″ tall. Draw on all the sides, all 4 sides. Looking at my drawing, our original rectangle is left in the middle, it has the X on it. That is the box base, the box size. We have now drawn the 1.5″ sides all the way around it. Write on all these sides that they are 1.5″
Now let’s do some math. How wide does your box need to be? The center is 3.5 wide, and the sides (look at your drawing) are 1.5″ each. There are 2 sides. So you add 3.5, plus 1.5 plus 1.5 = 6.5″. That’s how wide you need to cut your paper.
Now for the length. The center of your drawing (box base in the X) is 4.75 long, and you have 1.5″ sides on each end, so that is 4.75 plus 1.5 plus 1.5 = 7.75″. That’s how long you cut your paper. So for this box we cut our paper 6.5″ x 7.75″. That’s 6 1/2″ x 7 3/4″.
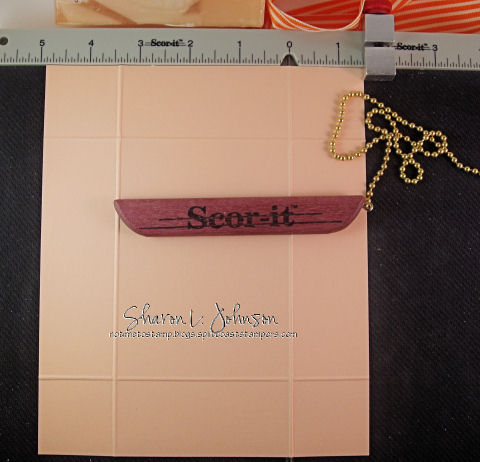
Then, where do I score? Well, remember our sides were 1.5″ high. That’s where we score — 1.5″ around all 4 sides. I’m using my full size Scor-It and I have set my guide at 1.5″ so there is perfect consistency on all my scores, making for a perfectly shaped box.
Now we need to clip our corners to form our tabs. You can see where I’ve clipped, and I actually take out a thin strip, rather just just one clip. Your box will bind a bit and not form quite as well if you don’t give those corner tabs room to bend in. This is particularly necessary when using a heavier paper. Then you need to put tape on your corner tabs. The tape goes on the RIGHT side of the paper (outside of the box)in the corners. When you fold this into shape, the tabs go on the inside of the box. Peel the tape and you’ll be all set!
Stamps: Small Self-inking Stamper by JustRite
Paper: Frosted Orange by Prism, SU Very Vanilla
Accessories: Scor-It, Ribbon, Tag Die by Spellbinders
Once my boxbase was made, I wrapped my soapwith ribbon and hung on a little tag made usingone of the Small Self-Inking Stampers by Justrite. These stampers have a great assortment of tiny words that fit perfectly into the Tag Dies by Spellbinders. Such fun for quick tags. I also made a similar tag to hang on the wrapped box.
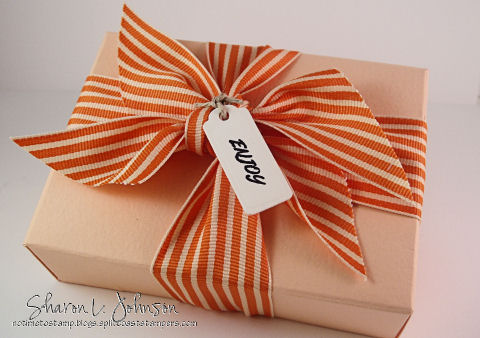
Now you need a box top, and there are no step-by-step photos to show you. But you make it in exactly the same fashion as the bottom — the only difference is the size you cut the paper. Cut the paper 1/8″ larger as to both width and length. This gives you just the right amount of room to easily slide your top over your box bottom. So for this soap box, you’ll need to cut your paper 6 1/2+ 1/8 =6 5/8 wide. For the length you’d figure 7 3/4+ 1/8=7 7/8 long. So cut your box top 6 5/8 x 7 7/8. Then score it exactly the same as the box bottom — score at 1.5″ on all four sides. Finish as above shown. Slip your cover on, tie with a ribbon, done — GORGEOUS!!!
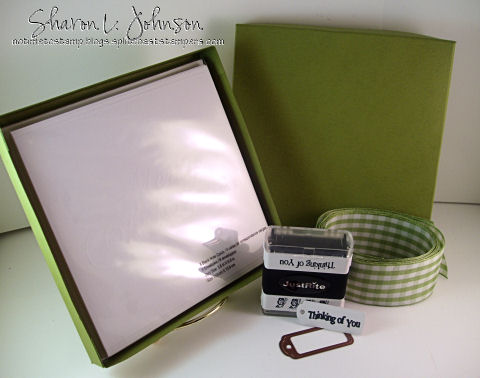
Now let’s try another box in another size and shape. This box will house the white square embossed cards from the $ Bin at Michaels. Again, we’ll figure it out just like we did above. Here’s my worksheet:
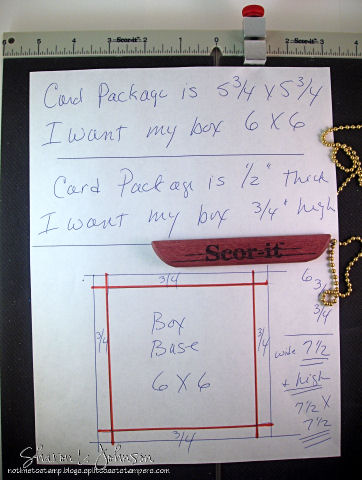
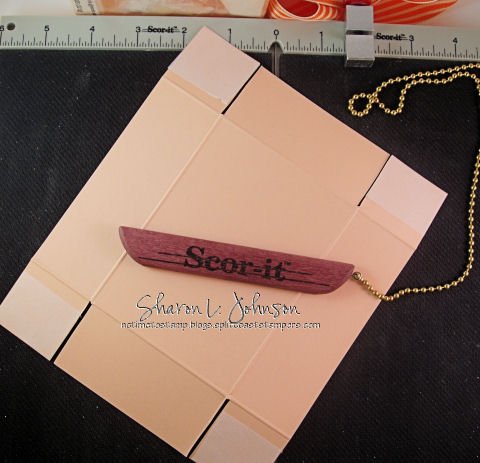
Again, we start by measuring the item. The card package is 5 3/4″ square, so we’ll want the box to be 6 x 6″. The card package is 1/2″ thick, so we’ll want our box to be 3/4″ high. Let’s sketch it out like we did above. Draw your 6 x 6 square in the middle and add your 3/4″ sides on all 4 sides. Now let’s do the math. 6 plus 3/4 plus 3/4 = 7 1/2. So cut your paper to a 7 1/2″ square. Take it to your Scor-It and score 3/4″ from all four edges. Refer to the photo of the first box to clip on the score lines to form your tabs, adhere tape, and put your box bottom together.
To make the top, this time I wanted a bit of a tighter fit. This box is so shallow, it can fit a bit tighter and still go on easily enough. So I want to make the box top 1/16″ inch larger, rather than the 1/8″ we did above on the deeper box. So when we add 1/16″ inch to our 7 1/2″ measurement, we get 7 9/16″. That’s how big you cut your top — 7 9/16″ square. Make the top just as you did the bottom. Again, done and GORGEOUS!!!
Stamps: 2X Stamper by Justrite
Paper: Spring Willow Medium by Prism, PTI White
Accessories: Scor-It, Ribbon, Tag Die by Spellbinders
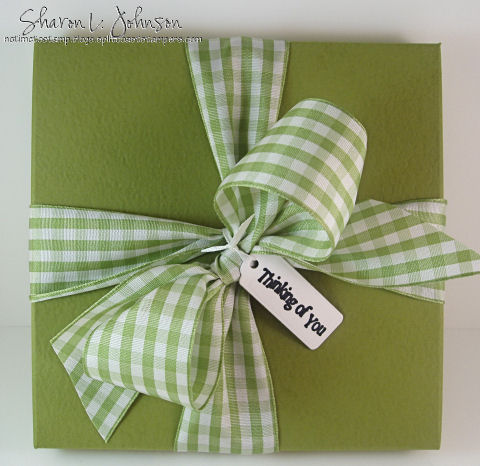
I made a tag for this box also, this time using one of the 2x Self-Inking Stampers by Justrite. There’s a great assortment of these fun little stampers as well. They stamp really great, giving dark and clear images. Really, when we find good buys like this in the $ Bin, we should stock up and have little gifts like this all made and ready and on hand for those times when we just need a *little something*!
Here’s a Few Tips:
- I usually prefer a heavy weight paper for boxes. Today I used Prism Prismatics and it works nicely with it’s somewhat leathery texture. For DP I particularly love Crate Paper for boxes. It’s a really great weight and texture. I also got some new12 x 12 cardstock from WorldWin called Double Mates. It hashas alinen-like textureand it is a different color on each side and of a weight that would work well for boxes. I think the fact that it is 2 colors would be really fun for these boxes.
- Once you design a box, make it first out of plain white cardstock. Cut, score and foldit, but don’t tape it together. This will let you see if it turns out the size you intended. THEN save this white box as a template for future use. Because you didn’t tape it, it’ll store flat. Before you know it, you’ll have a nice collection of box templates at your disposal.
If you’d like to read more about the Scor-It, they have a lot of good info on the Scor-It site. I do carry both the full sized and mini Scor-It Boards in the Stamp Simply Ribbon Store that you can see here.
And my apologies — I know I promised info today on my new stick pins. But this post ran so long again, it is late and I’m so tired — I’ll get it for you tomorow, OK — I’m sorry!!! Just want to say *thanks* for taking the time to click in and visit — much appreciated!!! Tomorrow we will be back to our regularly scheduled programming of quick, easy and flat cards for the season!!! Hope to see you then!!!
46 responses so far


Thank you! You have made this mystery so understandable for me! I’ve made boxes at workshops, and of course taped them together, come home and been clueless. And as we all know, one size does not fit all. Just in time for the holidays, too. I really think I can do this now!
I love the box templates you are sharing, Sharon and the gift ideas are wonderful.
What a clear and simple tutorial. This girl is not offended by simplicity, especially when it comes to math. Even though measurements are a part of my work day, making boxes always seemed like black magic, until now!
Thanks Sharon!
Thank you so much Sharon for your great tutorial on the boxes. You can never make it to simple for me, as I do not have a mechanical mind. This is absolutely great. I am printing it out too! Thank you for all the hard work you put in to this. And, your boxes are beautiful!
Joan
Woo hoo! Thanks, Sharon, for a wonderful tutorial!
Thank you so much, Sharon, for taking the time to do this tutorial so that I can actually make my own boxes!
Hugs!
Sharon ~
I hit the jackpot when I discovered your blog months ago!! You are AWESOME!! Thank you for this step-by-step build-a-box tutorial. I am definitely a newbie, and I appreciate the time you took to explain the behind the scenes steps. You ROCK, Sharon!! Thank you!! Judy
Yippee–a clear, concise, easy to understand tutorial
on making boxes of any size!!!!
thanks for taking the time to explain this,
Susan
I have always known bloggers and stampers to be the most generous, giving and caring people around and you have just proved it once again. What a great tutorial. Even I, (a sort of slow learner, visual person) understood the directions. For that, I can’t thank you enough. Now to put them in action! Thank you so much.
Thank you … thank you … thank you … thank you … thank you … thank you … thank you … thank you … thank you … thank you … thank you!
Talk about something truly useful and helpful!! I love this tutorial, Sharon! Thank you so much!
Wow! Thank you! So often I need a box for something and can’t find ‘just the right size’, now you’ve shown me how to make my own. I really appreciate it. I’m saving this for future reference!
Thank you so much for your wonderful sharing!!! I really love your blog!
I’m just wondering but what kind of paper are you useing?
Is cardstock good enough?
Hi Sharon,
Fantastic tutorial! Do you think these boxes would work just as well using a Scor-Pal for the scoring? I’m getting one for Christmas and am hoping it will do the trick for boxes as well as a Scor-It. Any thoughts?
Thanks!
A wonderful tutorial Sharon, again, thanks so much for sharing! Love this tutorial, it will surely help me tremendously with my boxes.
yippee skippee!! i love this sharon! but i don’t like math. can you help me? JUST KIDDING!! ha!
Thank you, Thank you, THANK YOU!!! I’m such a hands on gal, that trying to figure out my equations usually means that I make/take apart/make again, take apart again (you get the picture!! hehe) I will use this often I’m sure!! I believe you had a tutorial on “taller” boxes a while back. Am I correct in this? I will have to try and hunt that down later (kids to school first!)
Thanks again for the WONDERFUL tutorial!!
Thank you for the outstanding tutorial! You helped take the “guess” work out of making boxes. So kind of you to share your talents.
Thanks so much for the wonderful tutorial. You make it look so easy and your directions are so clear and concise that now I’ll tackle making a box using my own dimentions.
Such awesome tips!! Thanks so much for sharing all of this info about the beautiful boxes!! I REALLY love that yummy striped ribbon you’ve used!! TFS!
Fabulous tutorial! I used to make boxes, but kinda got away from it. But your tutorial has given me the ‘box bug’ again! Thanks!
Thank you for the wonderful tutorial! You make it sound so easy! Now to go home and actually try it!
Thanks for the step-by-step tutorial! What a great tool for the future!
Is this ever fun! What great “new to know” stuff! I know I’ll be using you instructions!
Thank you Sharon. I’ll be filing this away for much use in the future. I’m always wanting different sized boxes. Thanks for putting it down simply for us.
Great job on the tutorials. I love making custom packaging. I do have one quick question on cutting the thin strip so that the tabs don’t bind. I think I know the answer but I want to make sure. I’ll use the first box as an example so I can use exact measurements and hopefully be clear. The first cut I’m assuming is right at 1.5″, exactly on the score line. Is the second cut at 1.5″ – 1/16 (out of the tab) or 1.5″ + 1/16 (out of the side of the box)?
Hi Kerry — thanks for pointing this out — I didn’t think to address it. When I cut, I just cut out the score line — either the hill or the valley, depending on which side of the paper you are looking at. I cut out either the raised scored area or the indented scored area. I don’t measure anything — I just cut out the scored line up to the other scored line. Hope that helps — thanks! Sharon
Just in time for the holidays! What a great tutorial. You left no stone unturned!
Gorgeous, gorgeous boxes and a super fine job of explaining how to make them. Thank you for sharing! ð
Brilliant…I love all the boxes you have created…and have made quite a few…your directions are so simple…I think even I (who am mathematically challenged) can do…thanks so much..Rebecca
Thanks So much Sharon for the awesome tuturial. It is very helpful!
Gloria
I don’t like math, but you made this all so simple … and it even makes sense! Thanks so much! You’re a dear!
Thanks Sharon. you’re the best
You have made it seem so simple. I never thought to try and figure it out but it makes perfect sense. I would always stick to templates that had patterns and now you have shown me how to make my own. You are so wonderful – thanks a bunch!
THANKS for making it simple!! This is very timely with Christmas just around the corner – think of all the beautiful packages that will be made because of your awesome tutorial!! Thanks for all your time!!
Who knew making boxes could be so simple? I love your easy-to-understand helpful tips on stamping and creating these great little gift boxes! Thanks for always sharing your wonderful ideas!!
Sharon, your tutorials ROCK! You are one of the most talented, giving people online–{{{{Hugs!}}}}
Wow, what an awesome custom box tutorial. I can’t wait to print several copies for my hostess club. We have made boxes, but I did not teach them how to make custom boxes. Thank you, Thank you Sharon ð
Thanks for taking the time to teach us how to making boxes for whatever size we need.
Thank you so much! I needed a custom box to mail my gift of Christmas cards!
What great ideas……oh thank you so much…us newer people need all the help to make stuff we can get!!!!!!! ekc
[…] the process of making this style box, you can view more pictures and directions on this post or this post. And if you are looking for a Scor-It, they are available at both Joan’s Garden and […]
Hi!
Today I posted an entry on my blog with a link to yours.
Would you let me know that’s OK?
Thanks,
Nancy Ward
http://paperfriendly.blogspot.com
You are such a lifesaver. I have tried to figure this out for so long, have even got my blood pressure up.Lol.
Thank you, Thank You Thank you. Your the greatest
Fabulous! You must be a mathamatician! I will see if I can make a 5X7 box using all of your wonderful measurements. If you have made it I wouldn’t be insulted if you sent me a little note. LOL Many thanks.
Vickie
Beautiful boxes and AWESOME post! TFS the tutorial on how to make our boxes! Too cool!
[…] assuming you have basic knowledge of box construction. If you don’t you may refer to this SUPER ELEMENTARY tutorial I wrote a few years […]