Jan 21 2009
Embossed Red Velvet
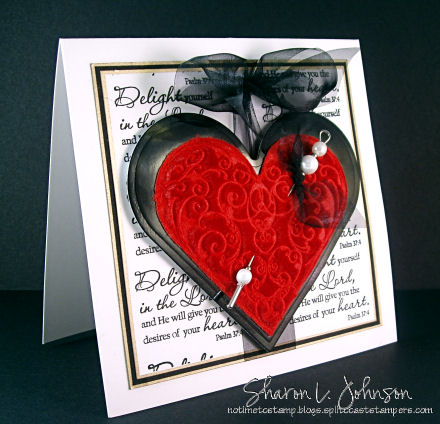
Since I had my velvet out yesterday, I couldn’t bear to put it away without trying to emboss on it. I had done this years ago using a rubber stamp, but the heart image I wanted to try today was an acrylic stamp, and it worked wonderfully!!! I used the Lace Heart by Flourishes and embossed it on red dressmaker velvet. Here’s my card:
Before I go any further, I want to say that this is a birthday card for my good friend, Deb, over at Dream in Color. HAPPY BIRTHDAY, DEB!!! Hope you are having a good one!!!
This is a 5.5″ square card. The background is stamped using one of the Plain Jane Christian sentiments by Verve, “Delight yourself in the Lord, and He will give you the desires of your heart.” Psalm 37:4. The white and black panel are edged in gold.
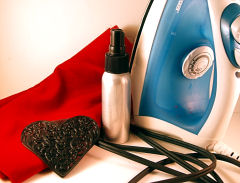
Here are the steps to embossing on velvet. You’ll need an iron, and the fewer steam holes on the bottom the better, a spritzer bottle of water, a stamp with good line images and velvet fabric. My velvet is a leftover piece so I don’t know what type of velvet it is, but it worked great!!!
-
Lay your stamp right side up on ironing board.
-
Cover your stamp with the velvet, fuzzy side down.
-
Spritz the velvet with water over the area where the stamp is.
-
With a DRY iron set to Cotton/Wool, try to place it on the velvet over the stamp with NO or as few holes as possible on the velvet/stamp. Hold firmly in place for 10 – 20 seconds. I did 20 seconds. Check to see if the velvet is dry. If still damp, hold longer. Be very careful that the velvet does not move under your iron or your image will be messed up.
-
Carefully peel the velvet off the stamp and it should look GREAT!!!
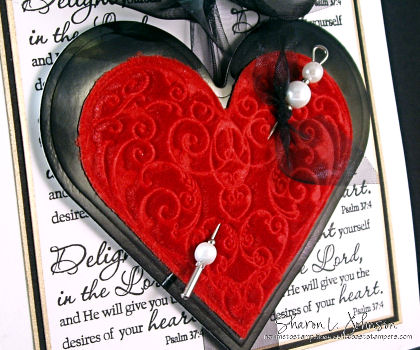
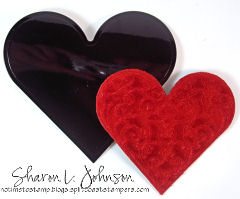
I then placed my Heart Nestability over my embossed velvet heart, taped it into place so it would not shift, and ran it through the Cuttlebug. I ran it through twice to make sure it cut and it did. This time I only had 1 little string to snip with scissors. Just as I did yesterday, I turned my heart upside down and gave it a good spray with spray glue, especially around the edges in an effort to prevent the edges from fraying. I then adhered my embossed velvet heart to my larger heart cut from Black Mirricard from Marco’s Paper. It is highly reflective and looks great against the velvet heart. I added a stick pin and adhered to my card front. A fairly easy card again!!!
I made a card with a black velvet heart yesterday, using a slightly different method that you can read about here if you like. Having fun with velvet this week!!
Stamps: Plain Jane Sentiment by Verve Visual; Lace Heart by Flourishes
Paper: PTI White; SU Black
Ink: Versa Fine Onyx Black, Gold Calligraphy Pen by Marvy Uchida
Accessories: Classic Heart Nestabilities by Spellbinders; SU Pretties Kit; Black Sheer Ribbon; Glue Dots, Glue Glider, Dimensionals, Iron, Water Spritzer, Velvet Fabric, Spray Glue
Thanks much for stopping in again today!!! Tomorrow we have our usual Stamp Simply Challenge up and I’m excited about this one. It’s one I’m going to be especially excited to see all your creations from!!! Hope you’ll have time to check in!!! As always, wishing you all a wonderful week!!!
46 responses so far


This is FABULOUS, Sharon! thank you for sharing the how to…I have never tried this and can’t wait to give it a shot! Happy Birthday wishes to DEB!!!!
i love way you used the plain jane to make the background. TFS!
this is a gorgeous card. you did a fantastic job in making this.
Goodness!!!!! Sharon, what a stunning card. I always thought that you can’t use acrylic stamps to do this technique. Thanks for trying and sharing. You are the BESTEST!!!
Did you finally get those clutches off of the pins? I replied to your e-mail that you were having trouble but did not hear back from you.
Hugs,
Sabrina
Wow, what an amazing card! I would never think of doing a technique like this. And even if I wanted to I don’t even know where our iron is, LOL. Maybe I should try to find it!
Thanks for the tutorial 🙂
WOW!!! How cool is this?! I’m going to have to try that velvet idea!!! Thanks so much for sharing!!! 🙂
Absolutely wonderous. How talented you are Sharon. Thanks so much for sharing. You are certainly one inspiration woman.
Wow! What a beautiful effect! I’ll have to give that a try. Your finished card is so gorgeous.
Wow Sharon this is fantastic! I love the embossing on the velvet. Thanks for the great explanation on how you did it. The black mirrored paper is perfect with it too. Great job!
Joan
My, I have to say that this card is even more beautiful IRL–if that can be possible! Took my breath away when I opened it! It will be heading for some type of frame, that is for sure! Thanks so much, Sharon, for the GORGEOUS card and birthday wishes!
Beautiful! Love the scripture too.
What an absolutely beautiful card! Thank you so much for the fantastic step-by-step on doing this. Now, I just have to find some velvet.
This card is absolutely gorgeous! I would never think to put an acrylic stamp and an iron together! Beautiful!!
STUNNING!!! I bought all the goods at convention last year to try this technique and they are still in the bag!! thanks for inspiration!
Absolutely GORGEOUS!!
Wow! What a fabulous, elegant Valentine card! And I love how you embossed it. Have you ever tried just running velvet paper through a cuttlebug with an embossing folder? that works too, and might be a little simpler and less scary for people.
Oh my goodness Sharon, how super awesome is that technique!!! Looks fabulous!
Oh my gosh, it’s incredibly beautiful Sharon, thank you so much for the tutorial, I’ve never tried this, it’s gorgeous!
WOW! Who knew that my long-forgotten iron would become such a fabulous cardmaking tool? LOL This is just fabulous Sharon! Thanks for sharing such an elegant, fabulous idea!
Great technique!! I’ve gotta try this one soon for Valentine’s Day!
Thanks Sharon!
I have been curious to see how “stamping” on velvet worked!! I just may have to try this (of course, I have to buy some velvet first!! hehe)
Sharon, this is stunning!!!! Love the fabric with iron stamping all those Flourishes really show beautifully!!!! Fabulous look!!!!! Love the scripture background stamping!!! Beautifully done!!!!
This is fabulous! The heart looks amazing and I love how you used the verse as the BG. I’m sure your card will be treasured!
This is gorgeous Sharon!!
Such a beautiful effect! Thanks for explaining this technique. I love the embossed look on velvet paper. I love to run it through my Cuttlebug with an embossing folder- great effect and easy! Guess I’ll have to hunt down my iron, now- LOL. Don’t think it would look as nice if I ran it through what we call are rotating iron aka the dryer!
Gorgeous! The embossed velvet really turns this heart into an elegant focal point. I definitely need to try this technique — thanks for the tutorial!
Beautiful card!!! I’ve done the velvet embossing on dresses and little hand bags, but never thought to do it with a stamp for a card. Thanks for sharing how you did this!
My word Sharon, your friend Deb is one lucky lady. This is a gorgeous birthday card. TFS! Sheila
GORGEOUS!!! Oh I LOVE the embossed velvet… love love LOVE it!!!!
Wow….how beautiful! Great technique and beautiful card. Thank you for sharing your talent!
This is absolutely gorgeous!
Wow! Gorgeous! Thanks so much for sharing the “how-to”!
What a beautiful card and great technique. Thanks for your clear details. tfs
love it I have seen this tech on TV many years ago and went out and bought some velvet and that is as far as I went with it LOL You did a great job
hugs
Norine
WOW!! An elegant card Sharon!! Thanks for the tutorial,I will have to give it a go.
Oh, my gosh! This is incredible! What a fabulous technique and an utterly gorgeous card!
Absolutely STUNNING! I LOVE this, Sharon! I will have to try this one! TFS! Hope you are doing well! Hugs & 🙂
Sharon,
I love this! I’ve embossed velvet but never thought of doing it for a card. Beautifull!
This is my FIRST time ever seeing this technique. Don’t think I’ll be brave enough (or will find my iron in the near future) to make this. Thanks so much for sharing your wonderful card!
Gorgeous!! This is Stunning!
Wow! This card is gorgeous! Love stamping on the velvet! Thank you for sharing you idea, Sharon!
Such a beautiful Valentine!! I love the velvet and pin!!
wow this looks really pretty love it
Hi there,
I love your card. Have you ever tried to run velvet through your cuttlebug? I have some of the velvet paper and it works like a dream in the cuttlebug embossing folders.
Kelly
A fantastic idea Sharon and a truly stunning card! Love what you’ve done with the red velvet – this one is a real show stopper!
WOW this is just stunning!
This is stunning! I have got to get some coloured velvet. Thank you for sharing how you did this! :O)