Aug 08 2009
Copic Demo and Quick Card
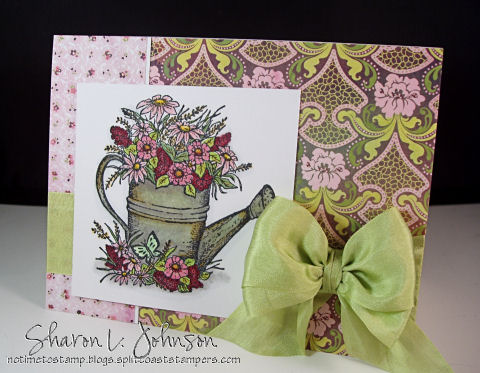
This is the card that Deb and I did jointly as a demo/project for all in attendance at the 2nd Annual Stampin’ in the UP event about a week ago. 6 x 6 sheets of designer paper were used on each card — all were either Basic Grey or Memory Box. The card packets were passed out in the morning, and then Deb worked one on one with each girl to Copic color their image, coordinating it with the designer papers they had in their packet.
I came home from the event with no finished card and no image — wouldn’t you know! So Deb kindly colored up this image and got it to me so I could do this post. Each girl made a similar card, but all had different DP’s and Silk Ribbon colors — they were SO gorgeous!!!
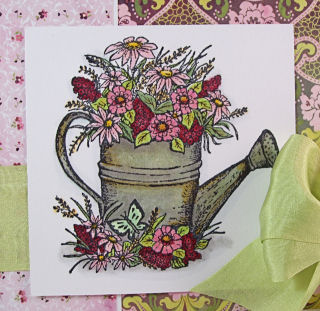
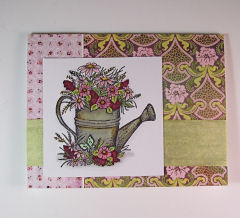
Here’s a closeup of Deb’s colored image, Happy Birthday by Our Daily Bread Designs. The girls all loved this image and had SO much fun learning to Copic color it!
After their image was colored, I took them in small groups and showed them my favorite, QUICK way to put a card together, using minimal layers, minimal cuts, Silk Ribbon and the Bow Easy. Following this method you can use your card either vertically or horizontally. We all used 6 x 6 DP sheets, and they work GREAT for this method, but any paper will do. But for my measurements below, just realize we are working with 6 x 6 sheets, so all lengths are 6″ long. The card is a standard A2 – 5.5 x 4.25″.
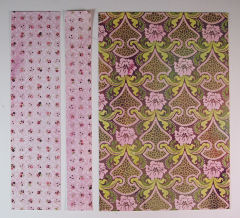

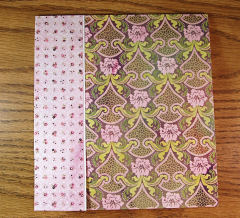
- Start with 2 sheets of 6 x 6 DP — one Solid (or small print) and one Printed (medium print).
- Cut your Solid Sheet so you have two strips — one 1.5″ wide and one 3/4″ wide.
- Cut your Printed Sheet so you have a 4″ wide piece.
2nd photo:
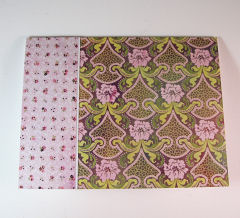
- Take the 3/4″ strip of Solid and turn it upside down so the white side is up.
- As shown in photo, adhere the 1.5″ Strip to the 3/4″ Strip, white side up, forming what I call a little *piping*.
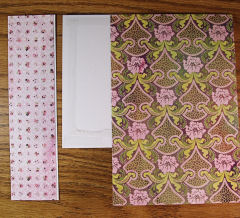
- Apply adhesive around all 4 edges of your card front and adhere your 4″ Printed piece to the card front, as shown, lining up top and right edges – YES, it is hanging off the edge by nearly 2″.
2nd photo:
- Now take your Solid strip with piping and attach to card front, lining up top and left edges. It will overlap the Printed sheet just a bit.

- Now, go to your paper cutter, open the card up and insert so the card inside is facing up towards you. Line up the edge of the card with the cutting blade and cut. You are cutting off that excess DP.
- 2nd photo shows the card with the excess DP cut off. This is just SO much quicker than trying to cut the DP exactly to fit. I do this ALL the time — I always cut larger and then cut off.

- Now it’s time to apply the ribbon and image. Wrap the ribbon around the card front, securing with heavy double sided tape under the area where the image will be placed, and then adhere the image.
- You’ll note on this card we did not mat the image. The paper was a crisp white and all DP’s had a lot of interest and offered contrast, so the image could stand alone and pop off the DP just on it’s white base — just another step saved!
2nd photo:
- Using your Bow Easy, make a bow. The one in this photo is a double bow. See links below if you don’t know what a Bow Easy is.
- Using 1/4″ Silk Ribbon in a color to match your bow, run the ribbon under the wide ribbon, as shown. Then lay your bow on top of the wide ribbon and over the narrow ribbon. Now you can draw up those narrow ribbon tails and tie them in a snug knot to hold the bow in place, then using your fingers or a tweezers, pick up the knot and run it under the bow so it is out of sight. You can clip the 1/4″ tails to make them look like a part of the bow. Clip the longer tails as well to a proper length.
And here again is the completed card — quick, easy and pretty! My absolute MOST favorite way to throw together a quick card!
Refer to this post if you arent familiar with a Bow Easy.
Refer to this post if youd like to read a Bow Easy Tutorial.
Refer to this store page if youd like to purchase a Bow Easy.
Refer to this store page if youd like to purchase ribbon.
Thanks for stopping in! Hope this little photo tutorial of our demo project was of benefit to someone!!! Have a wonderful remainder of the weekend and we’ll see you soon!!!
9 responses so far


Fantastic card and thanks for much for the tutorial on the bow. I just made a bow and was wondering what is the best way to do what you did. Definitely a BENEFIT to me!! TFS!
Oh my heavens! Simply brilliant and GORGEOUS Sharon! Hugs and hope all is well.
Sharon, Thanks so much for the quick card demo. I’m always looking for shortcuts and ways to simplify cardmaking. That means more time to color with Copics! One question…what is the finished size of the card? Is it A2?
Sue P Snellville, GA
I have, and really like the Basic Gray paper you used and the sketch. Thanks so much for the tutorial-helpful. Pretty Card!
Beautiful quick card! Love it! Great tutorial too. The Bow Easy is on my wish list.
A beautiful card Sharon and a fabulous tutorial! Thanks so much for sharing.
Absolutely gorgeous Sharon!! Thanks for all these little “tidbits” of information! Awesome stuff!
Such a pretty card Sharon & Deb did a great job coloring those flowers! That’s an interesting little tip on how you get that little piped edge to peek through. TFS! Sheila
This is so beautiful, and I love those flowers!! I love the papers and perfect bow too!!