Aug 26 2009
Reflecting…on Weddings and such
We’ve received an unusual number of wedding invitations this summer, far more than normal. But I guess it’s just the cycle. 25 years ago (in October) we got married, and though we were a bit older than most to be newly married, we shared those years of baby showers, birthing stories and years of birthday parties with all of our friends — gazillions of birthday parties. They soon turned into graduation parties that seem to have lasted for years. And now — weddings. And though I am so happy for each and every couple we have, or will, celebrate with this summer, it saddens my heart and brings a tear to my eye. Where HAVE those years gone? We were once the brides and grooms, the young parents, the ones running PTA and bake sales and coaching Little League, encouraging our youngsters to read those 100 books for the year-end T-shirt, and on, and on, and on. And now we’re going to weddings, to their weddings — our neighbor girl, our best friends sons, nieces and nephews. The cycle has come full circle, and now we can sit back and watch it start all over again, praying to God that he’ll Bless this generation as much as he has ours. And my tears turn to a smile — because that’s just the way it is —
______________________________
And now, with a dry eye, let’s take a look at the formal wedding card I made for this weekend’s wedding, along with a photo tutorial for my fun and flirty bow. Here’s the card:
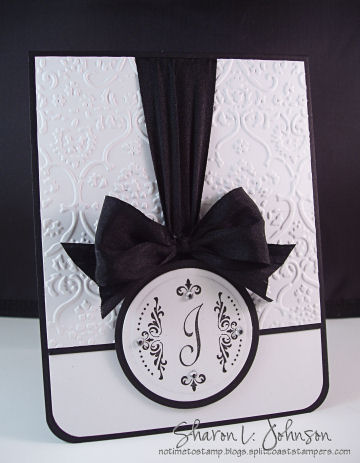
As expected, a simple card — black and white, Cuttlebug embossing, single initial monogram for the newlyweds and my fun and flirty black silk ribbon treatment. I’ve received a lot of emails asking how I do this. I have explained it previously, but never with photos, so this time I’ll try adding photos and see if that helps. It’s really so easy:
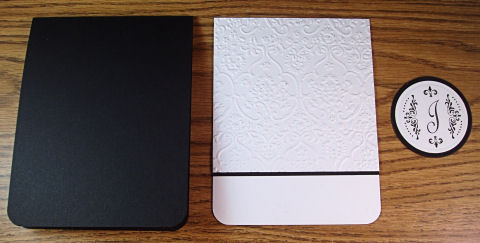
These are the pieces I start with: a black top fold card, my white panel and my monogram.
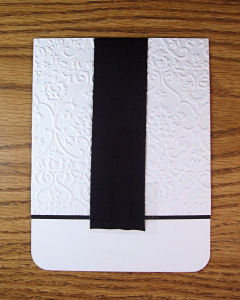
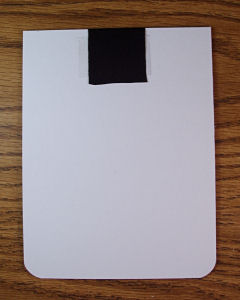
Photo 1 – Using a good heavy double sided tape, adhere the ribbon on the card front so it will be UNDER the monogram.
Photo 2 – Run the ribbon up the card front and secure on card back with the same type of tape.
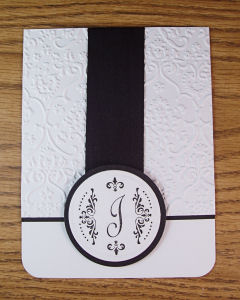
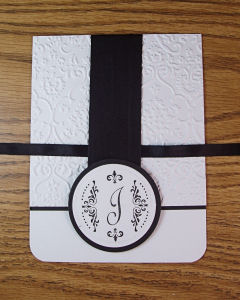
Photo 1 – Going back to the card front, adhere your monogram using SU Dimensionals
Photo 2 – Using a 1/4″ width of matching silk ribbon, run it UNDER the wide ribbon, as shown.

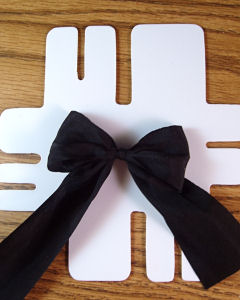
Photo 1 – It’s hard to see as the ribbon is so black, but I just drew the ribbon tails up and tied into a tight knot, then cutting my ends short and turning that ribbon so the tails end up UNDER the wide ribbon. It helps to use tweezers to do this.
Photo 2 — Make a bow on the Bow Easy
Note: If you are good at bow tying – you can skip the narrow ribbon and the Bow Easy — just run another length of wide silk under the wide silk strip attached to the card, draw up your tails and tie your bow.
And here’s another look at the final result. My bow is glued on with Aleene’s Fast Grab Tacky Glue (very cheap/Wal-Mart). I added clear rhinestones to the Damask monogram image. A quick and simple card with a bit of a formal look!
______________________________
The following items to make this card are available in the Stamp Simply Ribbon Store:
Damask Monogram Kit with Special Occasions Font from the Special Occasions Monogram Kit, OR Special Occasions Kit with the Damask 1-Letter Borders, all by JustRite
Black Silk Ribbon in 1.25″ and 1/4″ widths by May Arts with the Bow Easy
Petite Circle Nestabilities by Spellbinders
______________________________
Thanks much for checking in again today — I do so appreciate it! Wishing you all a wonderful week — we certainly do have the feel of autumn in the air already — ready or not — it is ALMOST here!!! See you soon!!!
48 responses so far


Sniff sniff… my oldest starts Kindergarten in 2 weeks and I have wondered were the last 5 years went…
Sharon, this is STUNNING and I love the photos, I am such a visual person. I appreciate seeing how you applied the bow! Hugs, michelle
Wow that is elegant!! Thanks for the tutorial.
What brand of corner rounder did you use? Mine is much smaller
Thanks for sharing!!
Man is this exquisite and elegant and black tie sophisticated! (no pun intended). wowow! You slay me girl! Thanks for the tutorial, I just love this incredible look and the rich silk ribbon that I wouldnever be able to tie ! Congratulations!
Classic elegance, your signature style. Love it! I try to treasure many wonderful moments of my kids’ lives and our lives as a family as the years do fly by sooooo quickly! Even though my kids are still in elementary school, I covet the times we have together as we walk through every stage of growing up, learning new things, and experiencing life together. They are a precious gift from God. As for marrying late – think I’ve got you on that one (34). Enjoy the weddings and the joy of the next generation. Blessings.
WAUW it´s gorgeous. Sooo simple and yet soooo elegant. I really love to watch your beautiful work here.
Gee, I’m already bawling after reading Nicole’s post and after yours, I think I’ll just go have a good old fashioned cry.. Life is cycles, isn’t it?
Beautifully simple and elegant, as usual, Sharon!
This is stunning! Love everything about it! {sMILES}
Thank you for the words of reflection this morning. It made be very thankful of my life’s journey. Your card was both beautiful and elegant.
Again thank you for sharing your talent.
A beautiful elegant card! Thanks too for the story, it is so true and brought tears to my eyes! Seems like only yesterday sitting on that yard swing as our little ones played and we had our time to visit together! God is good! TFS
Great card Sharon! I love the black and white. Nice tutorial too!
I can certainly relate to what you are saying! The years have just flown and we have seen lots of changes . Some good and some not so good.
Joan
A very beautiful wedding card Sharon. Your post brought tears to my eyes . . . where did the time go?
i married two of my daughters last year, this year i have a grandson, and suddenly i am invited to all the weddings and baby showers of my childrens friends. in my head i feel like i am still that 22 year old getting married,
but when i look in the mirror i see my moms eyes viewing my children.
time marches on ~ quickly when your enjoying it!
Sharon, your card is stunning. And that ribbon…boy? Do I need that tool? I am so bow impaired!
Hugs and smiles
this is so pretty and elegant love that bow
Hugs
Norine
Sharon, you talent for making the simple so gorgeous is amazing. I just LOVE to see your work!! Your commentary on the circle of life is so poignant. Brought a tear to my eye as well and a smile to my lips. Thanks for that pearl in my day!
Thanks for the tutorial to make this gorgeous wedding card! It truly is quite simple to create now that I’ve seen the process! Your reflection on life is exactly where I am today. Where have all those years gone and why did they go so quickly? When I was young, I thought I’d never ever be an adult, and now? whew! It happened much too quickly!
How exquisite ! I love black and white, as this combo makes such elegance and class. Simply beautiful. Pat
Beautiful!
This is a gorgeous formal card. thanks for the visual tutorial.
What beautiful thoughts and card. As my youngest started kindergarten Monday and I am now at home alone those words really touched me. Thank you for sharing.
Indeed, tears do turn to smiles. What a lovely invitation, thank you for the tutorial.
What an elegant card. I love the tutorial too. You make it look so simple to put together a unique and beautiful card. I can hardly wait to make one.
Stunning elegance!!! ð
Boy don’t I know what you mean about “where has the time gone!!” My GRANDDAUGHTER just started her senior year in high school this week … and next week MY BABY will be 40 … oh Lordy .. how can she be 40???? But I have been blessed with a heart full of wonderful memories throughout these years and I’m looking forward to a WHOLE LOT MORE!!!
I too have a wedding to go to in a couple of weeks … in Toledo, OH. Your card is SO gorgeous … I just might have to case this one!! Thanks for all your time & inspiration Sharon!
What a gorgeous bow!! Also the black and white formal wedding card is absolutely stunning. Thanks for more inspiration.
Hi Sharon,
I can’t believe how quickly time passes. I have a grandson starting 4 yr. old kindergarten in a few weeks. I remember the day our daughter & son-in-law brought him home, it feels like it was just yesterday! However, in my opinion being a grandparent is the icing on a life well lived.
Your wedding card is gorgeous & very elegant! A dear friend’s daughter is getting married next week so I may just need to copy it. Afterall the card I made for her bridal shower was a case of one I found after browsing your archives. TFS!
Sheila
[…] leaf images in this set to color! My ribbon is Moss Silk and the bow is done on the Bow Easy. This post tells you how I do this type of ribbon treatment – fun and easy! My sentiment is mounted up […]
the gathering creates such richness, TFS how you do that!
What a beautiful (and elegant) card!
Oh.. and I big puffy heart the Bow Easy!
Gorgeous!
I’m in that stage of my life, too. Be happy, as the next stage is grandparenting, and grandbabies are GRAND! ð
[…] by SU (love it!) and my White 100% Silk Ribbon by May Arts, the bow being made on the Bow Easy. See this post for how I did the ribbon treatment. And my corner rounder is by SU as […]
[…] favorite bow treatment of recent, using Celery Silk Ribbon and the Bow Easy. You can read this post to see how I do this. The bow is glued on with Aleene’s Fast Grab Tacky Glue — REALLY […]
Simply elegant. I love your site!
[…] The first 2 cards were standard A2 sized at 4.25 x 5.5″. This one is a 4.25″ square. I do like this size for a change every once in a while! You can read this post to learn how to do this bow treatment. […]
[…] A similar card in a vertical orientation. Note here how the sentiment is only adhered on the ends, allowing it to rise up over the ribbon — kind of a nice touch, I thought! Kaiser rhinestones are used to add some glitz. My Red 100% Silk Ribbon by May Arts is tied in my favorite fun and flirty fashion with the Bow Easy. You can read this post to see how it is done. […]
[…] My image is from Thinking of You by JustRite stamped in a good, crisp black ink — VersaFine Onyx Black, my favorite black. Though this set is sized to fit the Classic Oval Nesties, I cut mine with the Petite Oval Nesties. I’ve done this before and I’m lovin’ the space I have on the sides to use Kaiser Pearls. This my favorite fun and flirty blow treatment using the Bow Easy. Read here to learn how to do this ribbon treatment. […]
You have gotten me hooked — I have spent hours looking around your site. Great ribbon work — love it, love it. I am a fan.
pat
[…] Editing to add: My 100% Silk Ribbon by May Arts is tied in my favorite fun and flirty fashion, made with the Bow Easy. You can read this post to see how it is done. […]
[…] how I made this project on my Blog here. It even tells you how I did this bow treatment. But this post give you photos of how I do this bow treatment, if you’d like to […]
[…] deep. This card is a side fold allowing me to wrap my Antique Gold Silk around the card front. Instructions on how to do this type of fun and flirty bow can be seen here. I used the Bow […]
[…] the DP panel with Encore Gold Metallic Ink. I used my standard and most favorite ribbon treatment, explained here, using the Bow Easy. I cut my Monogram and matting with my Classic Square Nestabilities by […]
[…] Spellbinders. The ribbon is pink 100% Silk Ribbon by May Arts. The bow is made on the Bow Easy. This ribbon treatment is shown here. The entire panel is adhered to the bag with foam mounting […]
WOW this card is STUNNING and you bow instructions are great. Thanks.
First time i have seen black and white combination for wedding invitation. Its looking too good.
[…] The bow is 100% White Silk Ribbon by May Arts and my double bow was made using the Bow Easy. Instructions for this ribbon treatment can be found here. My card is 5.5″ square and the frame/sentiment was stamped with Versa Mark Ink and silver […]
[…] with silk ribbon my Fun and Flirty Bow Treatment — because that’s just what it is!!! I’ve linked to this little tutorial dozens of times. That was with black ribbon, probably not the best choice for visibility, so I’ll redo it […]
Wow! This is one of the most beautiful cards I have ever seen! You are such an inspiration!! TFS