Jan 13 2010
Spellbinders Labels 13 Ornament Tutorial
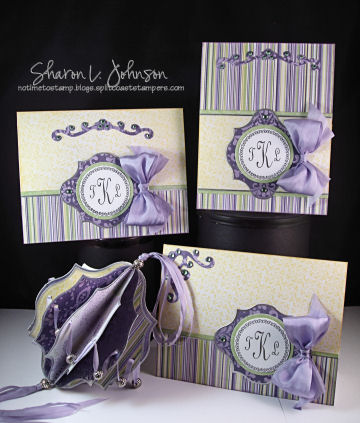
Yesterday I revealed the Spellbinders Labels 13 die templates and showed you a trio of cards and a coordinating ornament. Click here to see that post with links to 20 other fabulous projects by some of the best designers out there!
The majority of the items used to make this coordinated set are available in the Stamp Simply Ribbon Store. Links and more product information will be at the end of this post.
I promised you a step by step tutorial on the ornament I had created, so here we go:
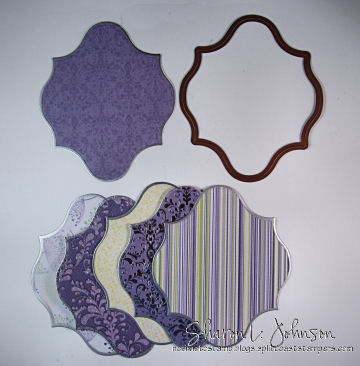
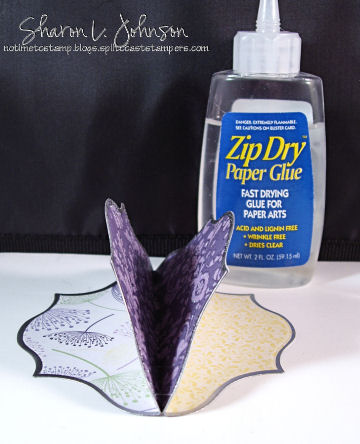
Using the largest Labels 13 die template, cut and emboss 12 pieces of coordinating designer paper. I used Lilac Avenue by Kaiser. Choose 6 darker and 6 lighter colors for variation in your ornament as it twirls around.
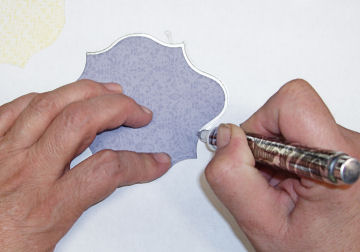
Once cut, and while working on a scrap of paper, use your Silver Leafing Pen by Krylon to go around the outside edges of the ornament. It is super easy to do this. I know it scares some people, but truly, anyone can do this. The Leafing Pen tip is like a marker tip. It’s kind of squishy. Starting at any corner, push your pen tip into the corner, holding the piece firmly down on the table with your left hand (assuming you are right handed) and draw the pen towards you in a firm and smooth movement, following the die cut edge, until you reach the next corner. The pen tip just kind of grabs the edge of the paper and it forms a groove into the pen tip, allowing the pen to just glide around the die cut, giving you a very smooth line. It easily goes around all the graceful curves on the Labels 13 die cuts. Set aside and let dry for a good 10 minutes or so until you handle it again. Edge all 12 die cut pieces.
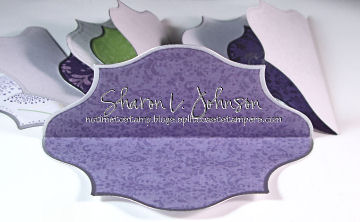
Once edged and dried, fold all 12 pieces in half lengthwise. Just line up what will be the outer edges of your ornament sections, and firmly press down, making a nice and neat crease.
Now we put them together. I found it easiest to work in sections of 3. You will end up with 4 sections of three. Then you can attach the sections together. It just comes straighter this way than trying to attach all 12 together at once.
The Zip Dry Glue that Jerri Kay always raves about is the perfect glue for this project. It’s a nice consistency, it’s clear, and once you apply it to your paper you have plenty of time to move the paper about so you can get them lined up just perfectly. It’s slippery and allows the paper to move well, but yet sticks super tight and uniformly. Shown above are 3 pieces attached to each other, forming one of our 3-section units. Make 4 of these.
Once all 4 are made, attach them all together in the same fashion, BUT DON’T GLUE THE LAST 2 SECTIONS TO EACH OTHER. We need to leave an opening to get our ribbon hanger inside.
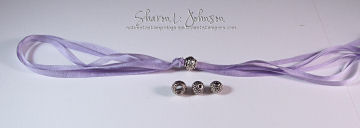
My beads came from Wal-Mart. When purchasing beads, make sure they have holes large enough for your ribbon to run through them easily. The beads with the largest holes were used for the hangars.
To make your ribbon hanger and tassel I used 1/8″ 100% Silk Ribbon by May Arts. I pulled out 3 lengths, just kind of eye-balling how long I wanted my tails to be. Each piece is folded at the top, making 3 loops. (We cut 3 pieces of ribbon, and by folding it we have 6 strands) Run the 3 loops through a bead. Bring the bead down as far as how long you want your hanger to be, then tie a knot in the ribbon above the bead.
Now we just lay our ribbon strands into the ornament (remember, we left one side open), apply glue and adhere it closed on the final section, with the ribbon tucked neatly inside. I couldn’t get a pic of this as I was all thumbs trying to do it, much less take a photo at the same time — my talents only go so far — LOL!!! It’s not hard, just hard to get a pic while doing it — LOL!!! When you get that final section glued, this is what it’ll look like:
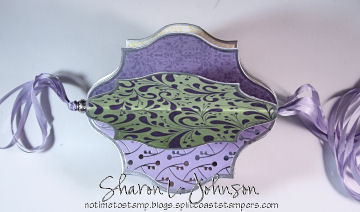
Now run the bottom ribbon through another bead, slide it up to the ornament and tie a knot so it’ll stay.
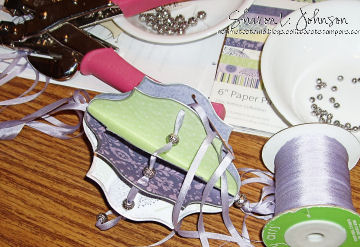
The final step is to punch holes in the centers of each *flap*. I used my Cropadile and to insure that they all came perfectly consistent, I made a little template from another die cut and placed it over each section as I punched — perfect, every time!
Now, using a large-eyed needle, run your ribbon through each hole, adding a bead between each section. Adjust your ribbon so you have the length you want to let your beads dangle how you like. I tied my ribbon into a tiny little bow at the back when I was done. And here you have the completed ornament:

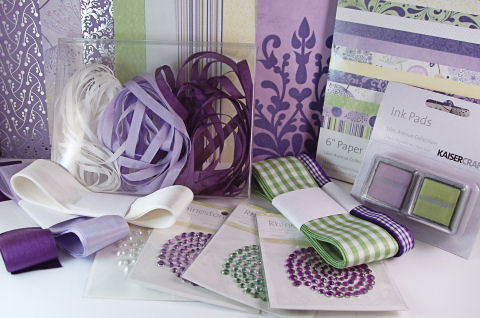
And I have one more fun thing I want to share with you today. I love this Lilac Avenue Paper by Kaiser and, at the request of many of you, I have put together a kit of coordinated items for your ease in creating lovely projects. I’ve called it the
Stamp Simply Lilac Avenue Kit.
The Kit includes all the pretties you’ll need to make a project similar to this, plus you’ll have tons left over for many, many more creations. Briefly, the kit includes the pad of Lilac Avenue 6 x 6 paper, coordinating ink, pearls, rhinestones and 100% Silk and Gingham ribbons by May Arts. Here’s what you’ll get:
You can read the entire description here.
I have the Krylon Silver Leafing Pen available here.
I have the Bow Easy and Spellbinders Petite Circle Nestabilities available here.
Just email me ([email protected]) if you’d like the Labels 13 or any dies I don’t have listed.
The Zip Dry Glue is available at A Touch of Grace.
All the JustRite Monogram Kits are available here.
My full line of May Arts Ribbons are available here.
______________________________
Thank you SO much for stopping in today! I truly do love your visits and appreciate that you’ve taken your time to check in on my projects. Thank you!!
I’ll be back later on Thursday night with our weekly Stamp Simply Challenge — hope you can join us then! See you real soon!
31 responses so far


WOW! First, I am SKERRRRD to do that outlining, really -it will make a straight line? I am a stickler for yucky edges -LOL! Second, A-MAZING project! and Third, I am soooo lovin’ your Lilac Avenue kit -sheer purple perfection!!
Hugs,
Your ornament is exquisite Sharon!! LOVE the design, the colors, the beads, everything!
Thanks so much for sharing this tutorial. The ornament is Beautiful! I will be making these soon.
Sharon, This is just too stunning! Just got my Lilac Avenue Collection pads today! They are simply gorgeous! Can’t wait to try your ornament! TFS!
Cherie
What a pretty ornament. I love this new spellbinders label set. I have a few sets so far and love all of them sooooo much! Thanks for sharing!
Goodness, Sharon, you never cease to amaze me!!! This is one breathtaking ornament!!! I love this new Labels 13 die…another gotta have ;D. Those colors are awesome and the attention to detail……..stunning! Hugs, Sabrina
A fabulous tutorial Sharon! Loved the designs when I saw them debuted with the dies! A wonderful kit as well! Love the papers and all the goodies you’ve included!
[…] This is another fun project I did using the S4-248 Labels 13 Die Template. It’s an ornament, just for fun, and it coordinates with the trio of cards above. You could hang this in a window or archway or anywhere you have a hook or knob! I LOVE having hand crafted items in view to enjoy throughout the day. It was made using the largest die template and came together much more quickly than one might think! I’ll plan to show you a full tutorial on this ornament in the next day or two, so check back in if you are interested!!! TUTORIAL IS POSTED — CLICK HERE. […]
Oh MAN I love this new die! You’ve showcased it so beautifully Sharon! And what great purple DSP, it’s so hard to find pretty purple in designer paper!
Sharon, thanks so much for the tutorial!
Love the ornament!
this is flat out cool!
Oh, Sharon, what a gorgeous ornament….and in my favorite color, too! Just
beautiful work.
Beautiful project, concisely explained.
Thank you SO much!
Chrissie
What a fab tutorial Sharon. Thanks for sharing it with us. The ornament is sooooo pretty and what an original idea too. It’s always a pleasure to pop along to your blog and see what goodies you have on show. If only I lived nearer I could come to one of your workshops in person.
Warmest best wishes,
Su
The ornament is simply beautiful Sharon….so Victorian looking, really stunning.
I edge so many things with Krylon that I do the following:- when I open a new pen I cut a ‘v’ notch out of the ‘nib’ before I let the ink down at all. Before I did this I just ran the nib around the shapes and the nib went raggedy. I was interested in your method for edging and must try that too….thanks for sharing that.
Great tutorial Sharon! You make it look and sound so easy!
Joan
Sharon, this is beautiful. I love the lavender papers you used. I am wondering how it would look in red for valentines day. Thank you for the tutorial.
ooh, that is awesome with the beads and ribbons strung through, love it!
beautiful ornament!
Charmaine
What a lovely ornament! I think that new nestie set is going on my list!! ð
AND I love the purple and green together!!
How lovely! Your creation is just gorgeous! I love the silver beads in between on your beautiful ribbon. TFS!
Gorgeous ornament Sharon – the colours are beautiful. These new dies are on my wish list and you have shown them off to perfection. Many thanks for a great tutorial.
HW(UK)
These are gorgeous! I think I’m going to make some for a Valentine’s Tree I’m making!
Catherine
My Jaw is on the floor…can’t speak….awesome…
[…] set of dies that I revealed for Spellbinders 2 days ago — you can see those posts here and here if you missed them. Can you recognize the pretty shape? Here I am only using about 3/4 of the die […]
Absolutely stunning, Sharon! TFS!!
So so GORGEOUS – Sharon!!! I’m in love with the colors :)!!! The spellbinder is so cool too!!! Hugs ~S~
Sharon, I followed your blog today to all of the samples for this kit. I love purple. I have to say your art is simply elegant and chic. I am just blown away with your work.
love this ornament.can’t sleep so reading through your tutorials….great job
magnificent ornament, Sharon!!
hugs,
Melanie
Wow…gorgeous ornament and fabulous tutorial. Thanks so much Sharon for sharing ð