May 11 2015
A Practical and Pretty Little Gift – by Sharon Johnson
Quick Note: Gorgeous NEW Paper - Cottage Living by Pebbles
Today I’m sharing the gift I gave to my Mom for Mother’s Day, though it is a super practical little gift for ANY time, especially for those who are well settled in life and really don’t want or need more “stuff”. And I’ve got a quick photo tutorial at the end of this post so be sure to scroll down if you are interested. I made a small 2×2″ box and enclosed a roll of postage stamps, with a small card to match. SUPER fun to do! I LOVE making these tiny boxes and haven’t made one up for so long. They are so very quick and easy to do and the roll of stamps (wrapped in tissue) fit inside perfectly! Take a look:
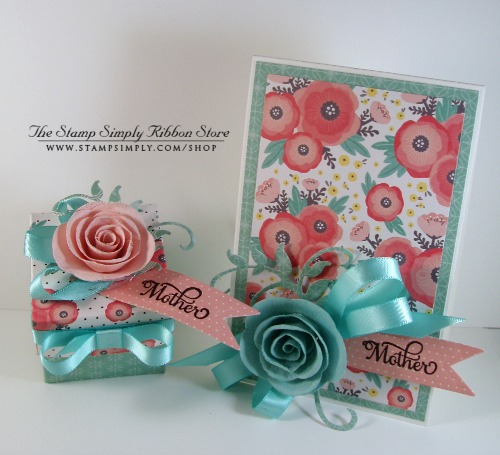
Here’s the box and the card to match.
Paper: Cottage Living by Pebbles – NEW!!!
Stamps: Extended Family Large Fancy Sentiments by JustRite – NEW!!!
Ink: VersaFine Onyx Black
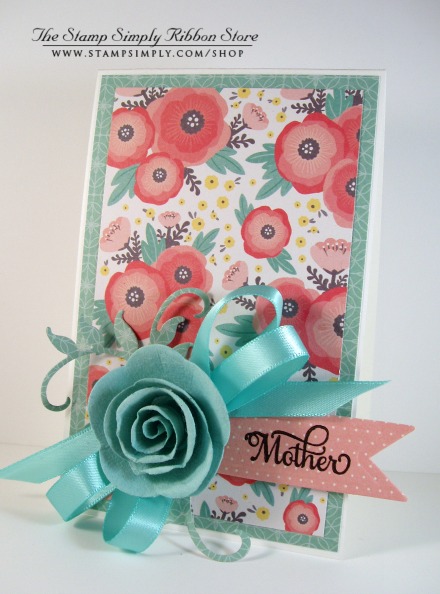
Here’s the card. It is 3.5 x 5.5″.
With the banner tail extended on the side, it still fits into an A2 Clear Box for presentation.
Ribbon: May Arts 3/8″ Double Faced Satin – Robin’s Egg Blue
(Find more colors and widths of this HA series of satin here – gorgeous!)
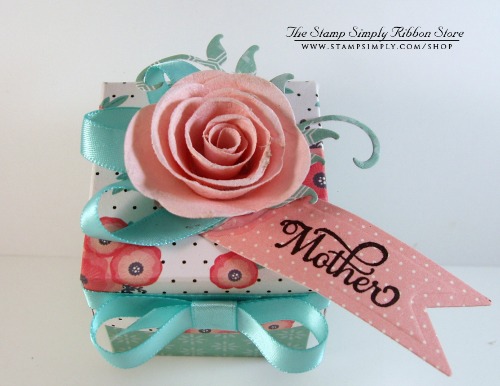
Here’s the box from the top view.
Flowers: Prima Butterfly Collection – Chorion
LOVE these flowers – they have totally flat bottoms for easy gluing.
Die: Retired Set – very similar to Spellbinders Die D-Lites Sprigs
Spellbinders A Gilded Life Petite Pennants (banner tag)
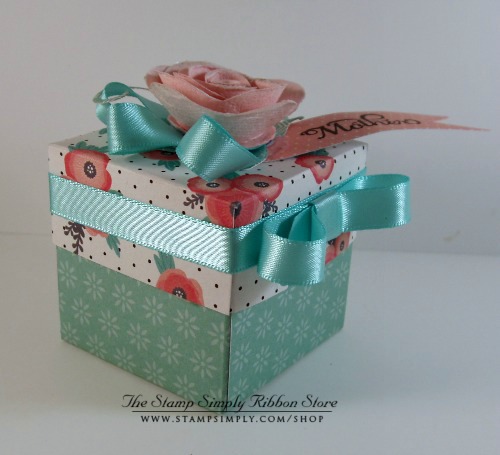
And here’s a side view of the box.
I wrap 1/4″ Scor Tape around the box top, then just apply my ribbon over the tape. The bow is made separately and glued on.
The Scor Tape was also used to adhere the box together.
Other adhesives used on this project are:
Tombow Mono Multi Liquid Glue, Crafter’s Pick Ultimate Glue, Thin 3D Foam Squares

Cottage Living by Pebbles NEW!!!
This is the paper collection I used today and I just can’t say enough good things about it!
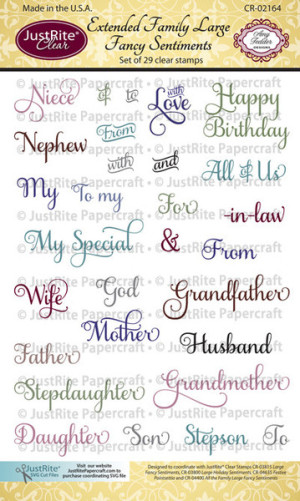
Extended Family Large Fancy Sentiments by JustRite – NEW!!!
This set is definitely one of those “keepers”. It’s so fun to customize your projects and it makes the recipient feel extra special, too!
All items available at The Stamp Simply Ribbon Store, as linked.
____________________
Box Tutorial
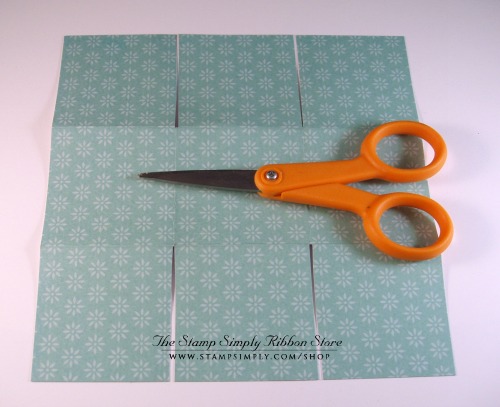
OK, if you are still hanging in with me here, we’ll move on to a quick photo tutorial on how to make these fun little boxes. I have 2 sets of measurements – one for making the boxes from 6×6 paper and another for making them from 6.5 x 6.5″ paper. All the Kaisercraft pads are 6.5″ and we use them a lot so wanted to be sure to include those measurements as well. Today’s box was made using 6×6 paper.
Box Base
If using a 6 x 6 sheet of designer paper, score 2″ in from all 4 edges. Cut slits for tabs, fold and tape. Your box base will be 2″ square.
If using a 6.5 x 6.5 sheet of designer paper - do the same as above your box base will just be larger at 2.5″ square.
Please note: When I cut my slits to create the tabs, rather than just slice on the score line once, I actually cut twice, very close together, so I’m cutting out a very narrow slice of paper. Doing this makes your box fold so much more easily than just slicing up once.
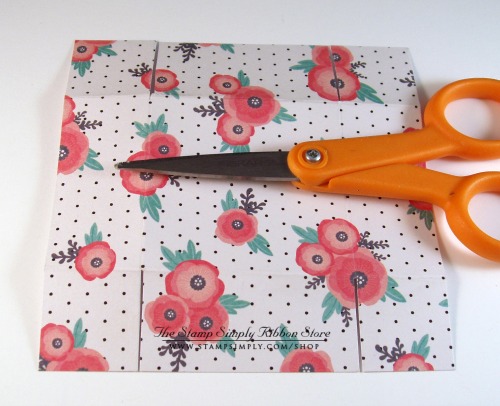
Box Top
If using 6×6 paper, select a coordinating sheet of designer paper, cut it to 4 1/16 x 4 1/16. Score 1″ in from all 4 edges. Cut slits for tabs, fold and tape. Your top will fit perfectly! It will be just a tad larger than the box base.
If using 6.5 x 6.5 paper, select a coordinating sheet, cut it to 4.5″ + 1/16 is how I would say it in my head, but it is really 4 9/16″. I know fractions confuse some people LOL!!! Just cut it 1/16″ inch larger than 4.5″. Score 1″ in from all 4 edges. Cut slits for tabs, fold and tape. This, too, will fit perfectly. Itll be just a tad larger than the box base.
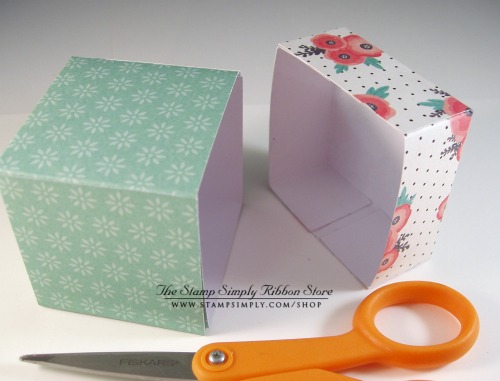
Once your slits are cut, it’s easy to see how your box will fold into shape.
Use Scor Tape to adhere it.
Using the measurements above, the box top is 1/16″ larger than the bottom, so it slides on so easily, but still fits snugly enough to stay put.
Then decorate to your heart’s content!
All items available at The Stamp Simply Ribbon Store, as linked.
____________________
IN STOCK BRAND NEW!!! JustRite MAY Release
Find NEW APRIL RELEASE by JustRite here
Find all Samantha Walker products in stock here ALL 50% OFF
!!!NEW Simple Stories paper collections I AM, Enchanted NEW!!!
!!!NEW MME paper collections Fancy That, On Trend NEW!!!
!!!NEW Ken Oliver papers in stock GORGEOUS!!! NEW!!!
Kens original collection Hometown is now in stock. It was unavailable for some time.
!!!NEW ALL the new Graphic 45 Collections are here! NEW!!!
!!!NEW Find Clear Boxes to fit 5 x 7 cards and envelopes (A7 size) NEW!!!
!!!50% OFF ENTIRE STOCK of Bo Bunny products are 50% OFF!!!
Find Christian themed items here.
Find Graduation themed items here.
Find Patriotic themed items here.
Find Masculine themed items here.
Find the NEWEST Spellbinders Dies here and here. NEW!!!
ALL JustRite Background Stamps are ONLY $10.00!!! (excluding NEW 2015 releases)
Our JustRite products are always reduced background, clear, cling, small cling, dies, 2014 Christmas Releases.
Our Spellbinders dies and folders are always reduced Dies, Die D-Lites, Embossing Folders.
Find Ribbon on Sale here.
Find New Products just added here.
____________________
Thank you for stopping in today we always love when you do!
Scroll down for tons of fabulous inspiration from our super talented Design Team.
Well see you again real soon!
__________
2 responses so far


Wonderfully sweet and great gift for, as you say, those settled in life’.
Thanx for the inspiration.
Sharon – What a lovely gift for your mother. I often gave my mother and mother-in-law a roll of stamps for Christmas and you know that it is something they will use. I think it is a very thoughtful gift and useful too! Thanks for sharing the tutorial.