May 08 2009
Bow-Easy Tutorial
The Bow Easy is available at The Stamp Simply Ribbon Store — click here.
This is a Bow Easy Step-by-Step Photo Tutorial. I realize the instructions prepared by the manufacturer that come with the Bow Easy are not the easiest to follow, and I prepared this tutorial to assist my customers in learning to use the Bow Easy.
As an added bonus, you may view a Video Tutorial by Jerri Kay on using the Bow Easy as well.
You may learn more about the Bow Easy by reading this post.
The Bow Easy is available at The Stamp Simply Ribbon Store — click here.
I hope my creations contained throughout this Blog will help to inspire you!
________________________________________
BOW-EASY TUTORIAL
Written by Sharon Johnson, Stamp Simply
https://notimetostamp.splitcoaststampers.com/
This photo tutorial is meant to serve as a supplement to the instructions that come with your Bow-Easy. I think often it is easier to follow photos than drawings. Please refer to the drawings that came with your Bow-Easy to see the 7 different leg configurations of the Bow-Easy, allowing you to make 7 different sized bows.

Photo 1: Hold the Bow-Easy in your left hand as shown. (These are written for a right handed person.)

Photo 2: Cut about a 12 length of ribbon for practice. Im using a ribbon that is 3/8 wide. Its best to use a medium width ribbon for practice — not too narrow, not too wide. Though once you learn, you can use any size ribbon. I am also using a striped ribbon as I think that may help you to follow the placement and path of the ribbon better. Place the ribbon across the legs as shown. The short ribbon tail is to the left of my left thumb. The remaining length of ribbon is off to the right.
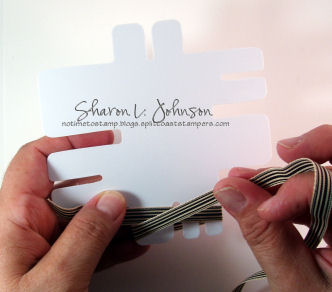
Photo 3: With the length of ribbon that is in your right hand, wrap it around the legs from behind, come up and across as shown.

Photo 4: Now take the end of the ribbon tail and run it through the opening between the legs. You are going above the ribbon first placed down, down into the *hole* and through to the bottom. It helps to do this if you cut your ribbon end at a sharp angle to form a point.

Photo 5: Once through the *hole*, you can pull it down from behind as shown. Dont pull it super tight, allow a bit of slack to insert the ribbon end through as explained in the next step.

Photo 6: Taking your pointed end again in your right hand, draw it up and pass it under the loop created in Photo 5, as shown. (During this entire process your left thumb continues to hold the short, left ribbon tail in place.) This is probably the most critical step. If you dont run it properly in this step, it just wont work, so try again! No worries!
6A: I probably should have had another photo between Photos 6 and Photo 7, but my cameraman is gone and I cant do this alone sorry! To make the transition from Photo 6 above to Photo 7 below, just pull on the ribbon tail in your right hand to make it tighten up as you begin to form your knot.
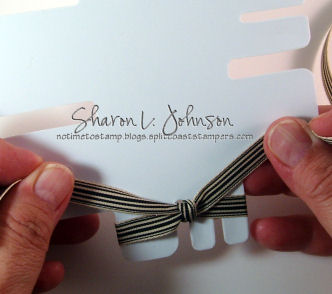
Photo 7: Keeping your left hand on the same little tail its been on from the beginning, and keeping the tail youve been working with in your right hand, pull the ends up and tight as it forms the knot. You are pulling up and away from you. What you have just created and what you see in this photo is the back of the bow. And it is also upside down, so to speak. But adjusting those ribbon tails up, they will be hanging down when removed.
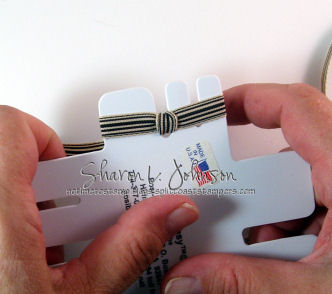
Photo 8: Turn the Bow-Easy over. This is what the right side of the bow looks like. Now merely slip it off the legs.

Photo 9: The completed bow. Tail ends were clipped after removing from the Bow-Easy.
There, now wasnt that fun! Each one you do gets quicker and quicker. If you mess up your first time or two, no problem. Just start over. It wont take long and youll be getting perfect bows!
To make a double-looped bow, refer back to Photo 3. Just continue to wrap the ribbon around one more time before proceeding to Photo 4. For a triple-looped bow, wrap it 3 times.
Again, you can use any width ribbon once you get the hang of it. The link I am providing below shows a card I did with a bird and blue bow. On this card I have a double bow using 1.25 silk ribbon. The ribbon is wide, but being so soft and lightweight, I can easily squish it onto the legs of the Bow-Easy. Once removed from the Bow-Easy, just fan out the 2 loops to your liking. Also shown on this link are numerous sizes and styles of bows from single looped to multi-looped prepared so kindly by Jenny Gropp. Thank you, Jenny! Heres that link:
https://notimetostamp.splitcoaststampers.com/2009/05/05/bows-made-easy-with-bow-easy/
I hope this photo tutorial has been helpful.
The Bow Easy is available at The Stamp Simply Ribbon Store – click here.
87 responses so far


A fabulous ribbon tutorial Sharon, I call the Bow Easy my secret weapon for fabulous bows . . . .LOL! Thank you so much for finding this little gem and passing it on to all of us!!!
Thanks Sharon! Can’t wait for mine to arrive!
Your instructions are excellent! Very easy to follow your clear directions and the pics are just the thing to help those of us that are more “visual” when learning how to use the Bow-Easy — Pictures Good! lol!!! I am so glad the Bow-Easy will be here in your store — it is such an amazing and inexpensive little tool — everyone needs it!!!
Thank you for sharing this tutorial, Sharon!
HAPPY MOTHER’S DAY, SHARON!! hope you day is wonderful and relaxing!
TFS your Bow Easy tutorial. I just watched Jerri Kay’s video tutorial……wow, she did an awesome job. I am a real fan of video tutorials as I am a visual kind of girl. I will be ordering my Bow Easy soon. Happy Mother’s Day, nancy
Wonderful tutorial, Sharon!! Thanks so much…and Happy Mother’s Day!!
[…] Bow-Easy update: I still expect shipments 2 and 3 to arrive by the end of this week or very beginning of next week. Those on *the list* will be notified as soon as they do arrive. Shipment 4 should follow by another 3/4/5 days. If you would like to be put on the waiting list, just email me at [email protected] and I’ll add you. Read more about the bow easy here and here. […]
[…] know what the Bow Easy is read here and here. You may still request to be on the waiting list by emailing me at […]
Hi Sharon, the bow easy’s my friend and I ordered arrived today, thank you so much, I have just had chance to sit down and have a go, I followed your photo tutorial and I was expecting to struggle a little as I am left-handed, but it went perfectly! I made a beautiful perfect little bow first time, it was so easy, I’m so impressed. I’m off now upstairs to find some more ribbon and have a go at the double and triple ones! Thank you Sharon.
[…] seconds using my Bow-Easy. If you don’t know what a Bow-Easy is, you can read more here and here. I am still gladly taking orders. My bow is attached with a glue dot. Making pretty bows has […]
[…] a card – LOL!!!Don’t know what the Bow Easy is, then read more about the bow easy here and here. I have plenty more coming and orders are welcome at any time.Wishing you all a wonderful week […]
[…] I do believe the creator of this stamped sentiment by JustRite from the Tiny Words Set most likely intended this for the back of a card… made with love, then you sign or initial your creation. However, I just adore this tiny little sentiment and feel it is totally appropriate for the front of a hand-made card. The recipient will be so pleased to know this creation was … made with love … just for them! My paper image was cut using my old dressmaker pinking shears and my lace border and threading holes were done with Martha Stewart punches. This 100% silk ribbon is perfect for threading as it is so soft and piable it essentially adds NO bullk. My bow was then made using the Bow Easy and applied with glue. Dont’ know what the Bow Easy is? Read here and here. […]
Sharon, I just received my Bow-Easy in the mail a few minutes ago and have made several bows with it already. The instructions that came with it were not clear enough to be helpful, the video was helpful, but I found your photo tutorial the most helpful. Thanks for all the helpful info. I know I am going to enjoy making bows now. I’ll probably put bows on everything now. grins.
Thank you.
Leslie
[…] and it certainly does make pretty bows easy to accomplish. I followed Sharon’s tutorial here. Thank you, […]
I would like to order 2 of the Bow Easys. Tell me how I can get them.
Thought i’d share a tip.
If you get a bulldog clip, or one of the other squeeze type ones.
Then place it over the gap between the two bow sections, the hole in the centre…
When you thread the ribbon through the hole the ribbon is trapped and can’t come off the bow maker till you remove the clip.
This really helps when you are using ribbon that keeps slipping off, as you try to tie the bow.
I just received my Bow Easy this morning and was really struggling to follow the instructions with it. Your tutorial has helped been a great help. Thank you!
Clare x
[…] Refer to this post if youd like to read a Bow Easy Tutorial. […]
[…] make such a pretty little bow. You can find the Bow Easy here, and a tutorial on how to use it here.  Many of my bows, however, I still make the old-fashioned way — just hand tied.  […]
[…] bow was made with the aid of my Bow Easy from Sharon Johnson. I found Sharon’s instructions here very easy to follow, but she also gives a link to Jerri Kay’s video tutorial. It’s […]
Wonderful tutorial, I am so appreciative!
Where can I buy a bow easy in Fayeteville, NC or on the internet?
Hi Sharon,
Can’t wait for the bow easy to arrive. Thanks again a thousend times.
Greetings from the Netherlands, Ellen
I am so glad ther was pictures to see. I sometimes do not understand written directions
[…] See my Photo Tutorial on how to use it here. […]
[…] Bow easy tutorial (engelska) […]
Excellent information, this is exactly what I needed. Thanks. Keep up the good work! -thanks for the information i will go and take a look for it. –
Thank you so much! Your picture tutorial is so much easier to follow than the manufacturer’s instructions! I can do it now!
Can you mail me the instructions. I tried and tried a couple of days ago and could not make a bow. So tonight I came looking for instructions and found your site.
Thanks.
Could you send me the instructions so I can have something to follow along with as I try again to succeed making a bow with this bow easy.
Thank you.
A setback or disadvantage of each mutation is favorable with the same or larger seeds.
It only needs early cultivation to become a power.
http://www.coach-bags.cc/New-Coach-Handbags-79/
If you shed tears when you miss the sun,you also miss the stars.
it’s very good
Thanks for posting this. i really had good time reading this.
He was born in Edinburgh, Scotland. In 1847, the son of a man who was consumed, passionately consumed, with the workings of the human voice, how it is produced and used, and especially, in teaching the deaf how to use it. For in those days, you see, the deaf lived in permanent solitude. Not only could they not hear, they could not speak. After all, how could they pronounce words, they couldn¡¯t hear? Perhaps this obsession of the elder Bell was one of the reasons he married whom he did. For the woman who would give birth to the inventor of the telephone¡¡ was deaf!
In a sense, Supra Skytop II
Supra Skytop II Shoes is not just a shoe,
When Cheap Supra Skytop II was started relatively new to the scene but I think we are all agree that supra had a significant impact on the shoes.
All happy people are grateful
Very good post .I like it.Thank you.
prom dresses 2011 from http://www.dresspromgirl.com
Hi there,
Really nice job,There are many people searching about that now they will find enough sources by your tips.
Also looking forward for more tips about that
Hi there,
Really nice job,There are many people searching about that now they will find enough sources by your tips.
Also looking forward for more tips about that
Really nice job,There are many people searching about that now they will find enough sources by your tips.
http://www.donikeshox.com/
Thank you so much for this tutorial! I have owned this Bow-Easy for a year or more and could never get it quite right. After reading your directions once I have been making lovely little bows. The photos were extremely helpful. Thanks again.
I can not figure how to purchase this. Is says the site is not available or something. How can I do that?
Thank you for sharing This knowledge.Excellently written article, if only all bloggers offered the same level of content as you, the internet would be a much better place. Please keep it up!
Good stuff as per usual, thanks. I do hope this kind of thing gets more exposure.wedding menu cards
Cool DIY!Good page,thanks for your share
Thank you so much because of this tutorial! We have owned this Bow-Easy to get a year or maybe more and may never get it quite right. After reading your directions once I have already been making lovely little bows. The photos were extremely helpful. Many thanks..
I discovered your blog site on google and check a few of your early
posts. Continue to keep up the very good operate. I just additional up
your RSS feed to my MSN News Reader. Seeking forward to reading more
from you later on!
A nice written article, it really make me read it from the first till the last letter and Im totally agree with the point you have exposed.
best regards !
Thanks for your detailed steps
I will try to make one for a card
I love to read this type of stuff. Good and attractive information I take from it..Thank you for posting such a nice article
You made some decent points there. I looked on the internet for the issue and found most individuals will go along with with your website.
so nice your blog
Oh my goodness! an amazing article dude. Thank you However I am experiencing issue with ur rss . Dont know why Unable to subscribe to it. Is there anyone getting identical rss problem? Anyone who knows kindly respond. Thnkx
http://livecricketonlinestreaming.info/
http://knelt.org
http://goldsilverwholesale.com
The others produce durable boots but people most often than not end up with a sore foot.
Getting your first pair of boots whether it is for work or play, make sure you grab the best pair.
Great information you got here. I’ve been reading about this topic for one week now for my papers in school and thank God I found it here in your blog. I had a great time reading this.
[URL= http://www.bellspharmacy.com/maincategory/1/generic-viagra.html ] Generic Viagra [/URL]
[URL= http://www.bellspharmacy.com/category/5/silagra.html ] Silagra [/URL]
[URL= http://www.bellspharmacy.com/category/6/zenegra.html ] Zenegra [/URL]
hier stelle ich das ebook catch him and keep him von christian carter vor welches beziehungstipps für frauen gibt. http://catch-him-keep-him.de/ dort ist der download des buches
To say the truth I am very impressed by what you told. You share tons of interesting info, neat and excellent design you have got here. It’s certainly one of the most informative stuff on this topic I have ever read.
Hello! I am very pleased with the effort and dont feel like adding anything in it. It a perfect thing which is being done. Keep the good work!
Nice one! Really its very inspiring post..keep up the great work..
Must concede that you are on the list of best blogger I ever saw. Thanks for posting this informative article.Fantastic post and thanks for sharing. Some factors in here I have not thought about before.
Great information you got here. I’ve been reading about this topic for one week now for my papers in school and thank God I found it here in your blog. I had a great time reading this.
moncler coat moncler coat jacket
I wonder how you got so good. This is really a fascinating blog, lots of stuff that I can get into. One thing I just want to say is that your Blog is so perfect!
What a wonderful guide for me? Really you have done a good job by posting this blog. Now a day, we don’t want to spend time to go there. Simply we can watch it in Internet…
I have been reading blogs on this subject for a few hours now and your content is the most informed I have read thus far.
s or otherwise not.In each case, you are eligible to use or why not be symbolized by way of a property attorney at law in order to. Whether or not a new non-attorney house merchant or even dealer gives report prep or even deal operations companies, an excellent real estate professional will ensure the consumer and also owner consumers understand that they could come with an lawyer should they need to throughout the selling or buying method.Which Can not Provide Legitimate AdviceOne vital examine contemplate is always that salesmen along with brokerages who’re not necessarily law firms usually are not able to supply legal counsel. Precisely what make up legal counsel? This is the difficult issue. Essentially, whatever would likely response the particular query “what can i
Interesting post. I have stumbled this for my friends. Hope others find it as interesting as I did.
This is really great post and I love watch mr bean show
I was looking for some topics that are enough popular and finally founded your blog, it has superb topics with great popularity.
This is awesome, I will tell my friends about this. All hail! To the blogger, Kudos! download free ebooks resell rights
Your Blog is very good, I like it! Thank you for you sharing!Your blog is really helps for my search and i really like it.I just cant stop reading this. Its so cool, so full of information that I just didn’t know.
Excellent tips,thanks a lot..
hi,
I’m going to spend more time learning to the Bow Easy,this is one of the best post I found so far…. A fabulous ribbon tutorial Sharon
What an adorable card! Thank you for the chance to win a bow easy! I’ve been drooling over them!
riasiaheda1972
Sharon, I just received my Bow-Easy in the mail a few minutes ago and have made several bows with it already. The instructions that came with it were not clear enough to be helpful, the video was helpful, but I found your photo tutorial the most helpful. Thanks for all the helpful info. I know I am going to enjoy making bows now. I¡¯ll probably put bows on everything now. grins.
Thank you.
Leslie
Really nice job,There are many people searching about that now they will find enough sources by your tips.
Buy cheap christian louboutin shoes in jimmy choo Outlet online store and Franklin and Marshall Outlet online store with low discount
Care about you very much, because I am in focus on your blog. Like it very much. Silently watching.
cheap nike nfl jerseys
Cheap Michael Kors Handbags sale in Michael Kors Outlet online store, discount jackets on sale in Ralph Lauren Outlet online shop
Welcome to Nike store to buy soft nike free run nike free run shoes to walk and run.If you love fashion shoes,just choose isabel marant outlet isabel marant outlet to buy what you like.